Children's Check-In
Children's Check-In is a secure, kiosk-style system for safely checking children into their rooms before a service. Parents check in at a tablet or kiosk using their phone number, receive a security code, and present that code at pickup. Staff can monitor all active check-ins from the admin dashboard and check children out when parents arrive.
What you can do
- Parents check in children at a self-service kiosk in seconds.
- Staff check in children manually from the admin dashboard when a parent needs help.
- Volunteers monitor who is in each room and can check out children from the dashboard.
- Admins configure rooms, manage SMS paging, and monitor room occupancy in real time.
Step 1 — Set up your check-in rooms
Before the kiosk can be used, you need at least one room. Rooms define where children can be placed and how many can fit.
- In the main navigation, go to Events & Attendance → Children's Check-In.
- Click Manage check-in rooms in the Room occupancy panel. There is no separate menu entry for rooms — that link is the way in.
- Click Add room.
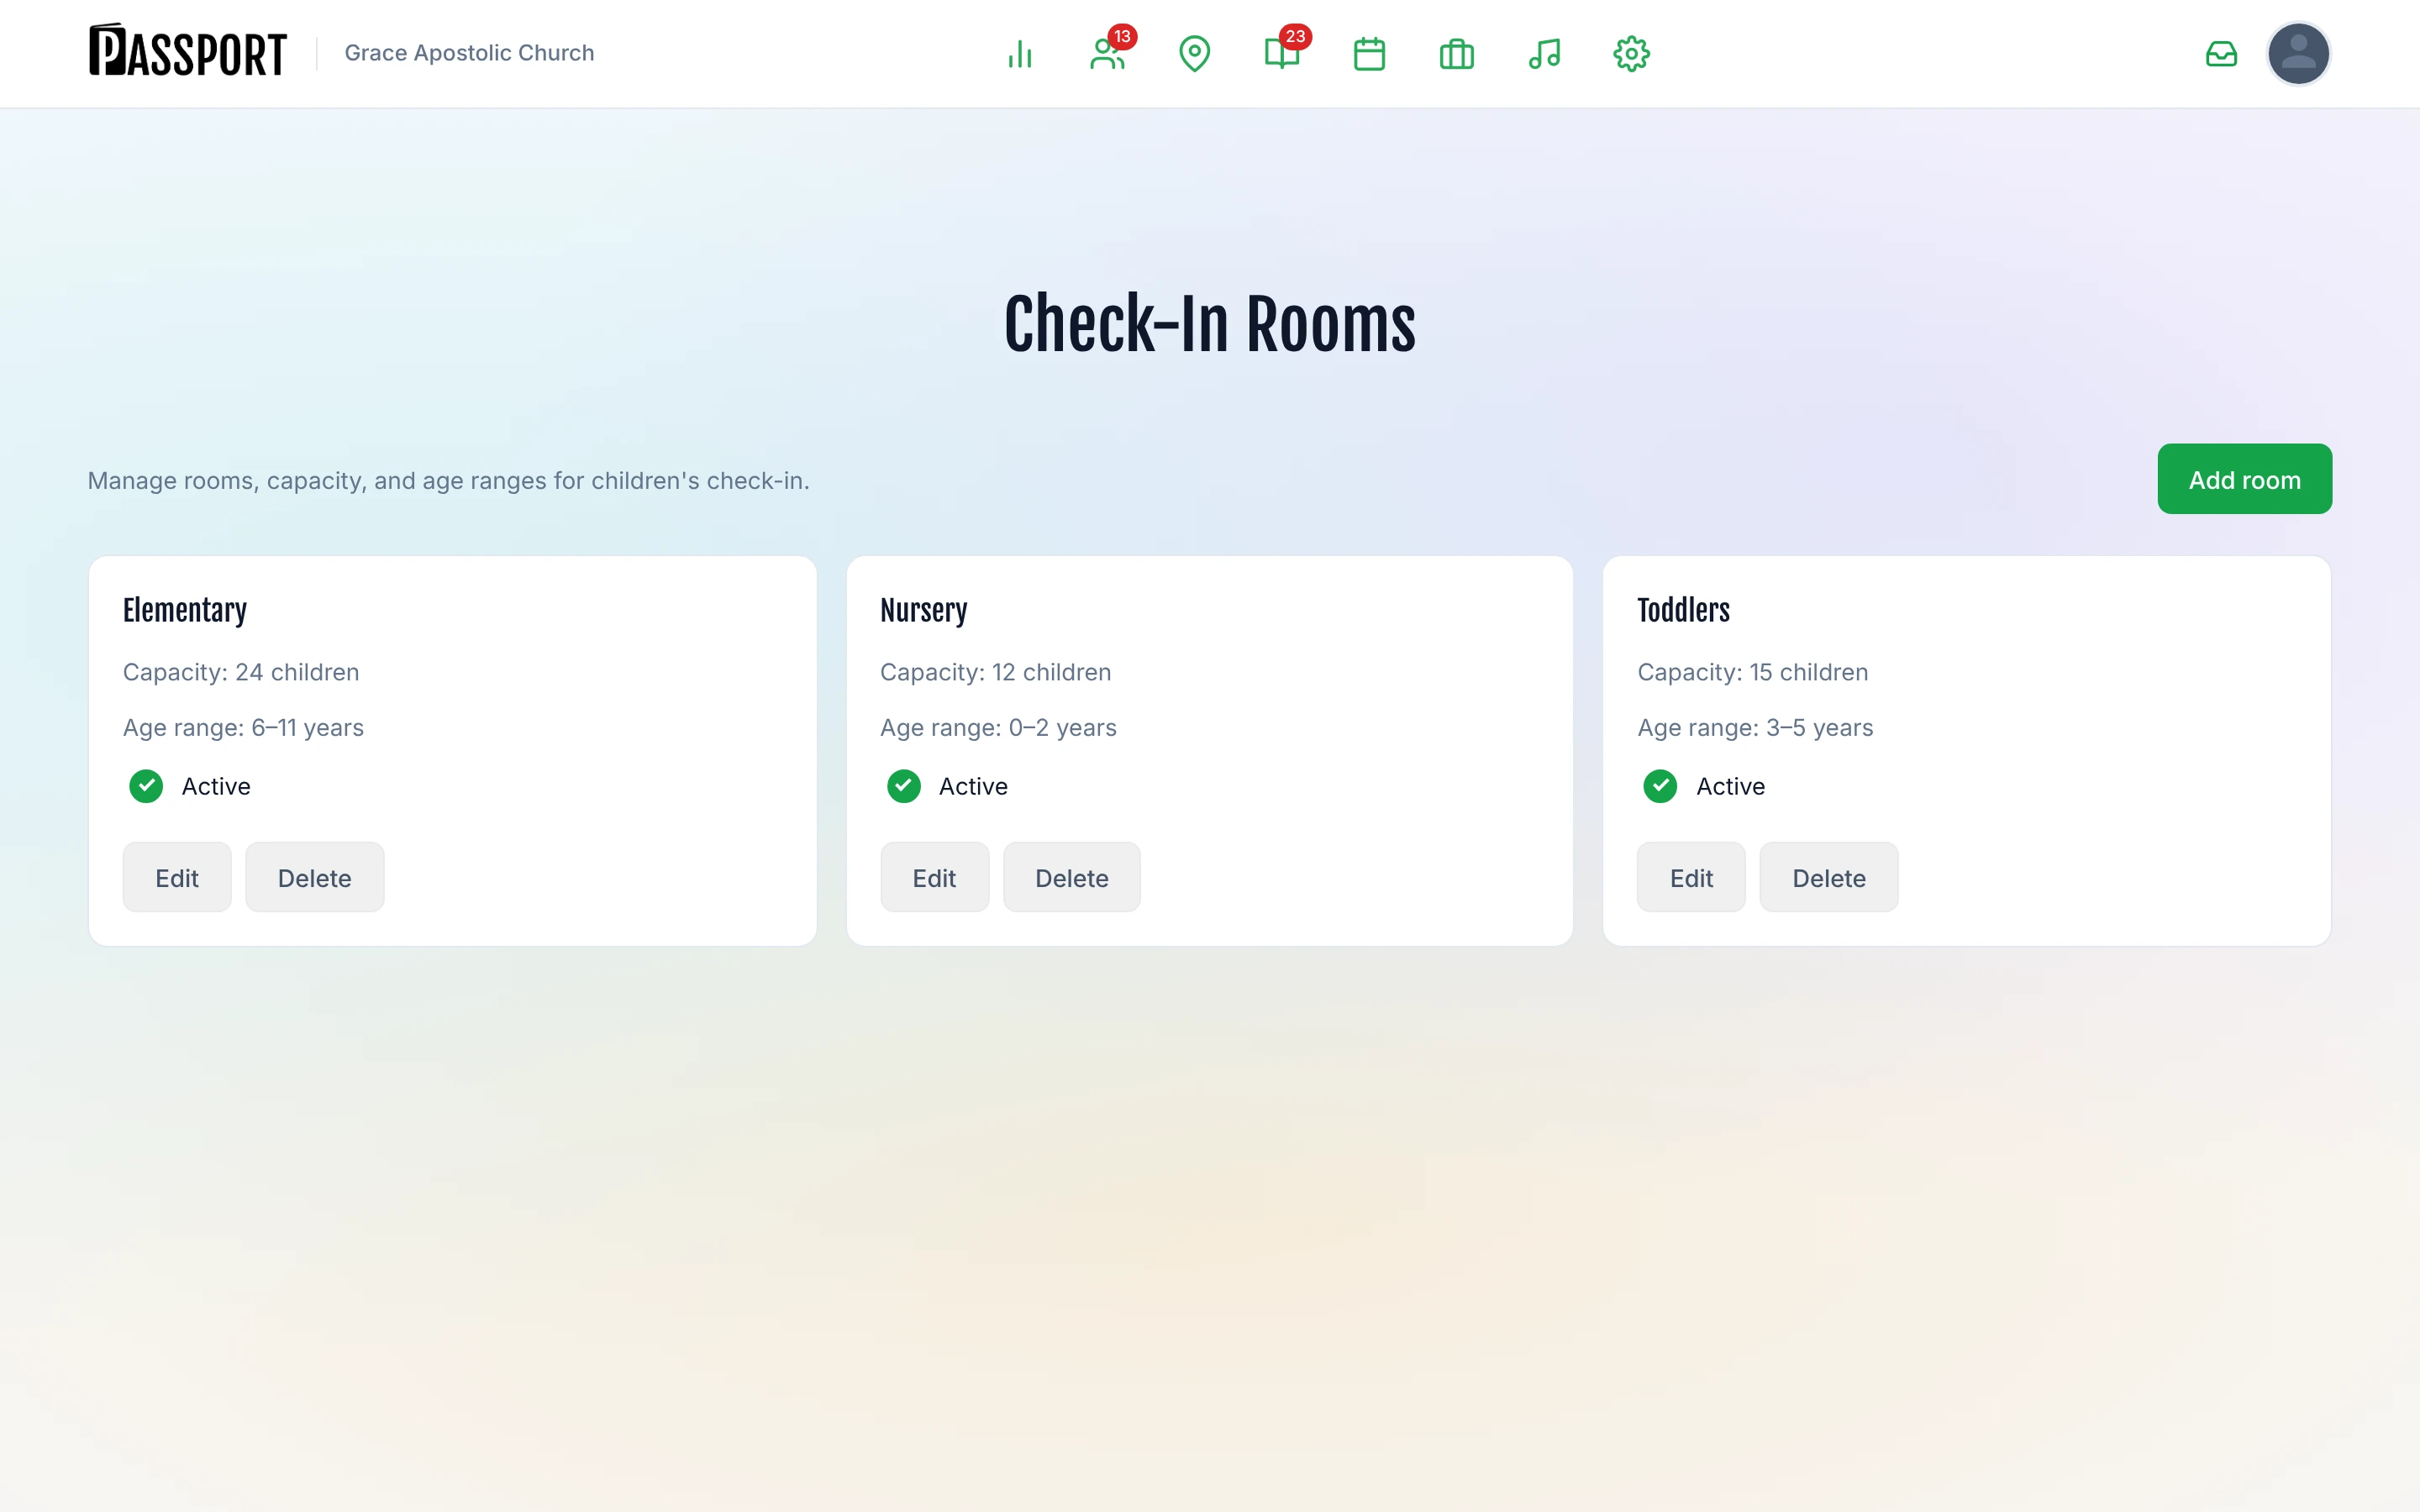
- Fill in the room details in the Add room modal:
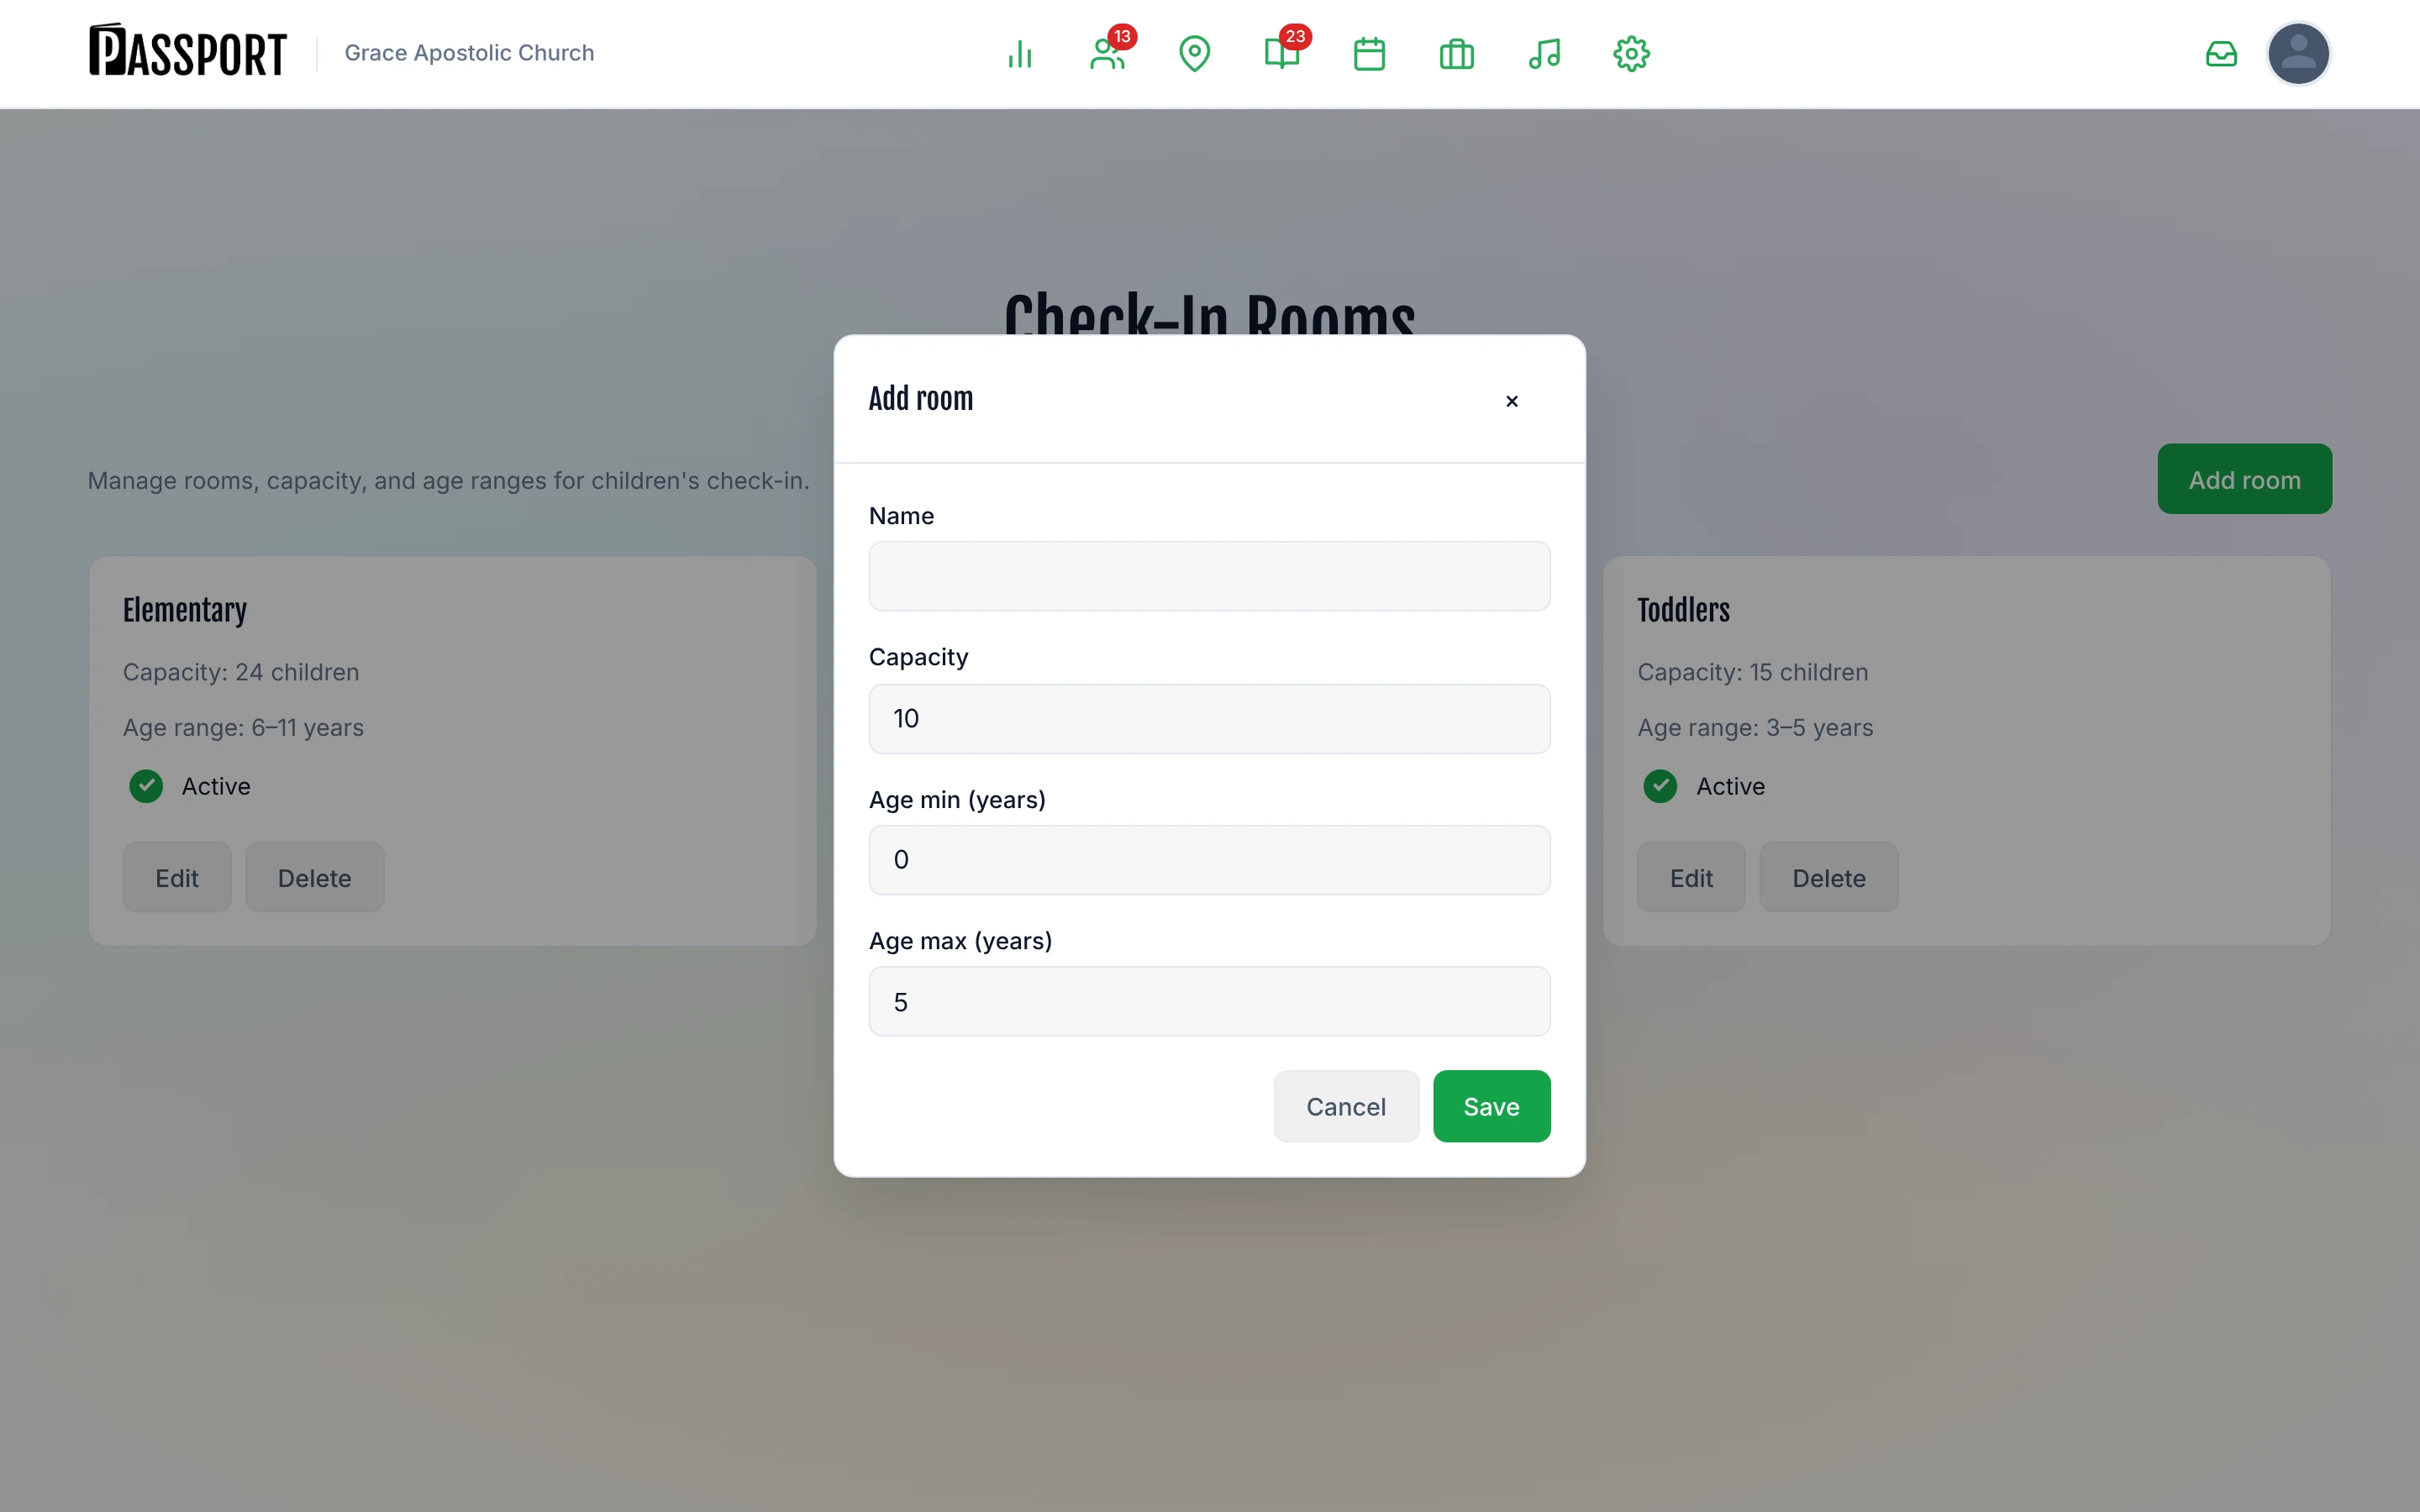
- Name — The room name parents will see (e.g., "Nursery", "Kindergarten", "Upper Elementary").
- Capacity — Maximum number of children allowed in the room at one time.
- Age min / Age max — The age range served by this room, in years. The kiosk uses these to suggest the right room for each child.
- Click Save.
Repeat for each room you need. The room appears in the Room occupancy panel on the dashboard.
Activate or deactivate a room
Each room card has an Active / Inactive toggle. Inactive rooms are hidden from the kiosk and from room assignment. Deactivate a room when it is temporarily unavailable rather than deleting it.
Edit or remove a room
Click Edit on the room card to change the name, capacity, or age range. Click Delete to remove a room permanently. Passport asks you to confirm before deleting.
Step 2 — Set up a kiosk device
The kiosk runs in a browser at /checkin/kids. You can open it on any tablet or computer. After a one-time setup, the device remembers your church for 30 days without requiring anyone to sign in again.
First-time setup
- On the kiosk device, open a browser and go to your Passport URL, then add
/checkin/kidsto the address bar. - The device shows the Kiosk Setup screen.
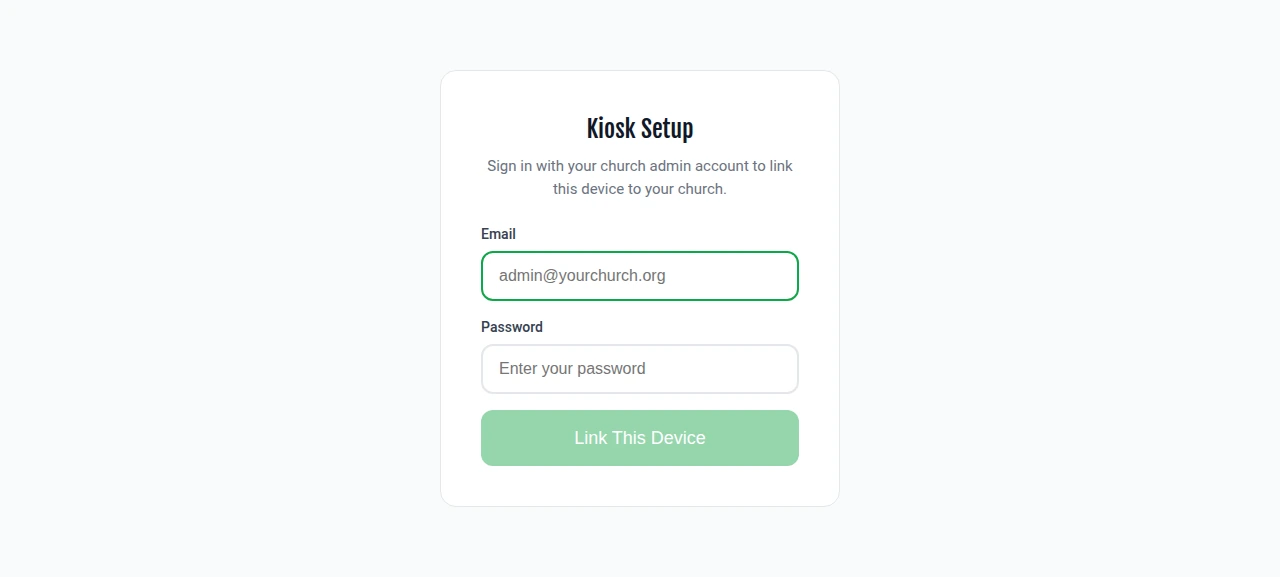
- Enter your Passport admin email and password, then click Link This Device.
- Passport links the device to your church and immediately signs out. Your credentials are not stored on the device.
- The kiosk is ready. The phone entry screen appears.
Use a dedicated account (such as [email protected]) for kiosk setup if you want to limit which credentials can be used on the device.
The device stays linked for 30 days. When it expires, repeat the setup steps above.
How parents use the kiosk
Checking in children
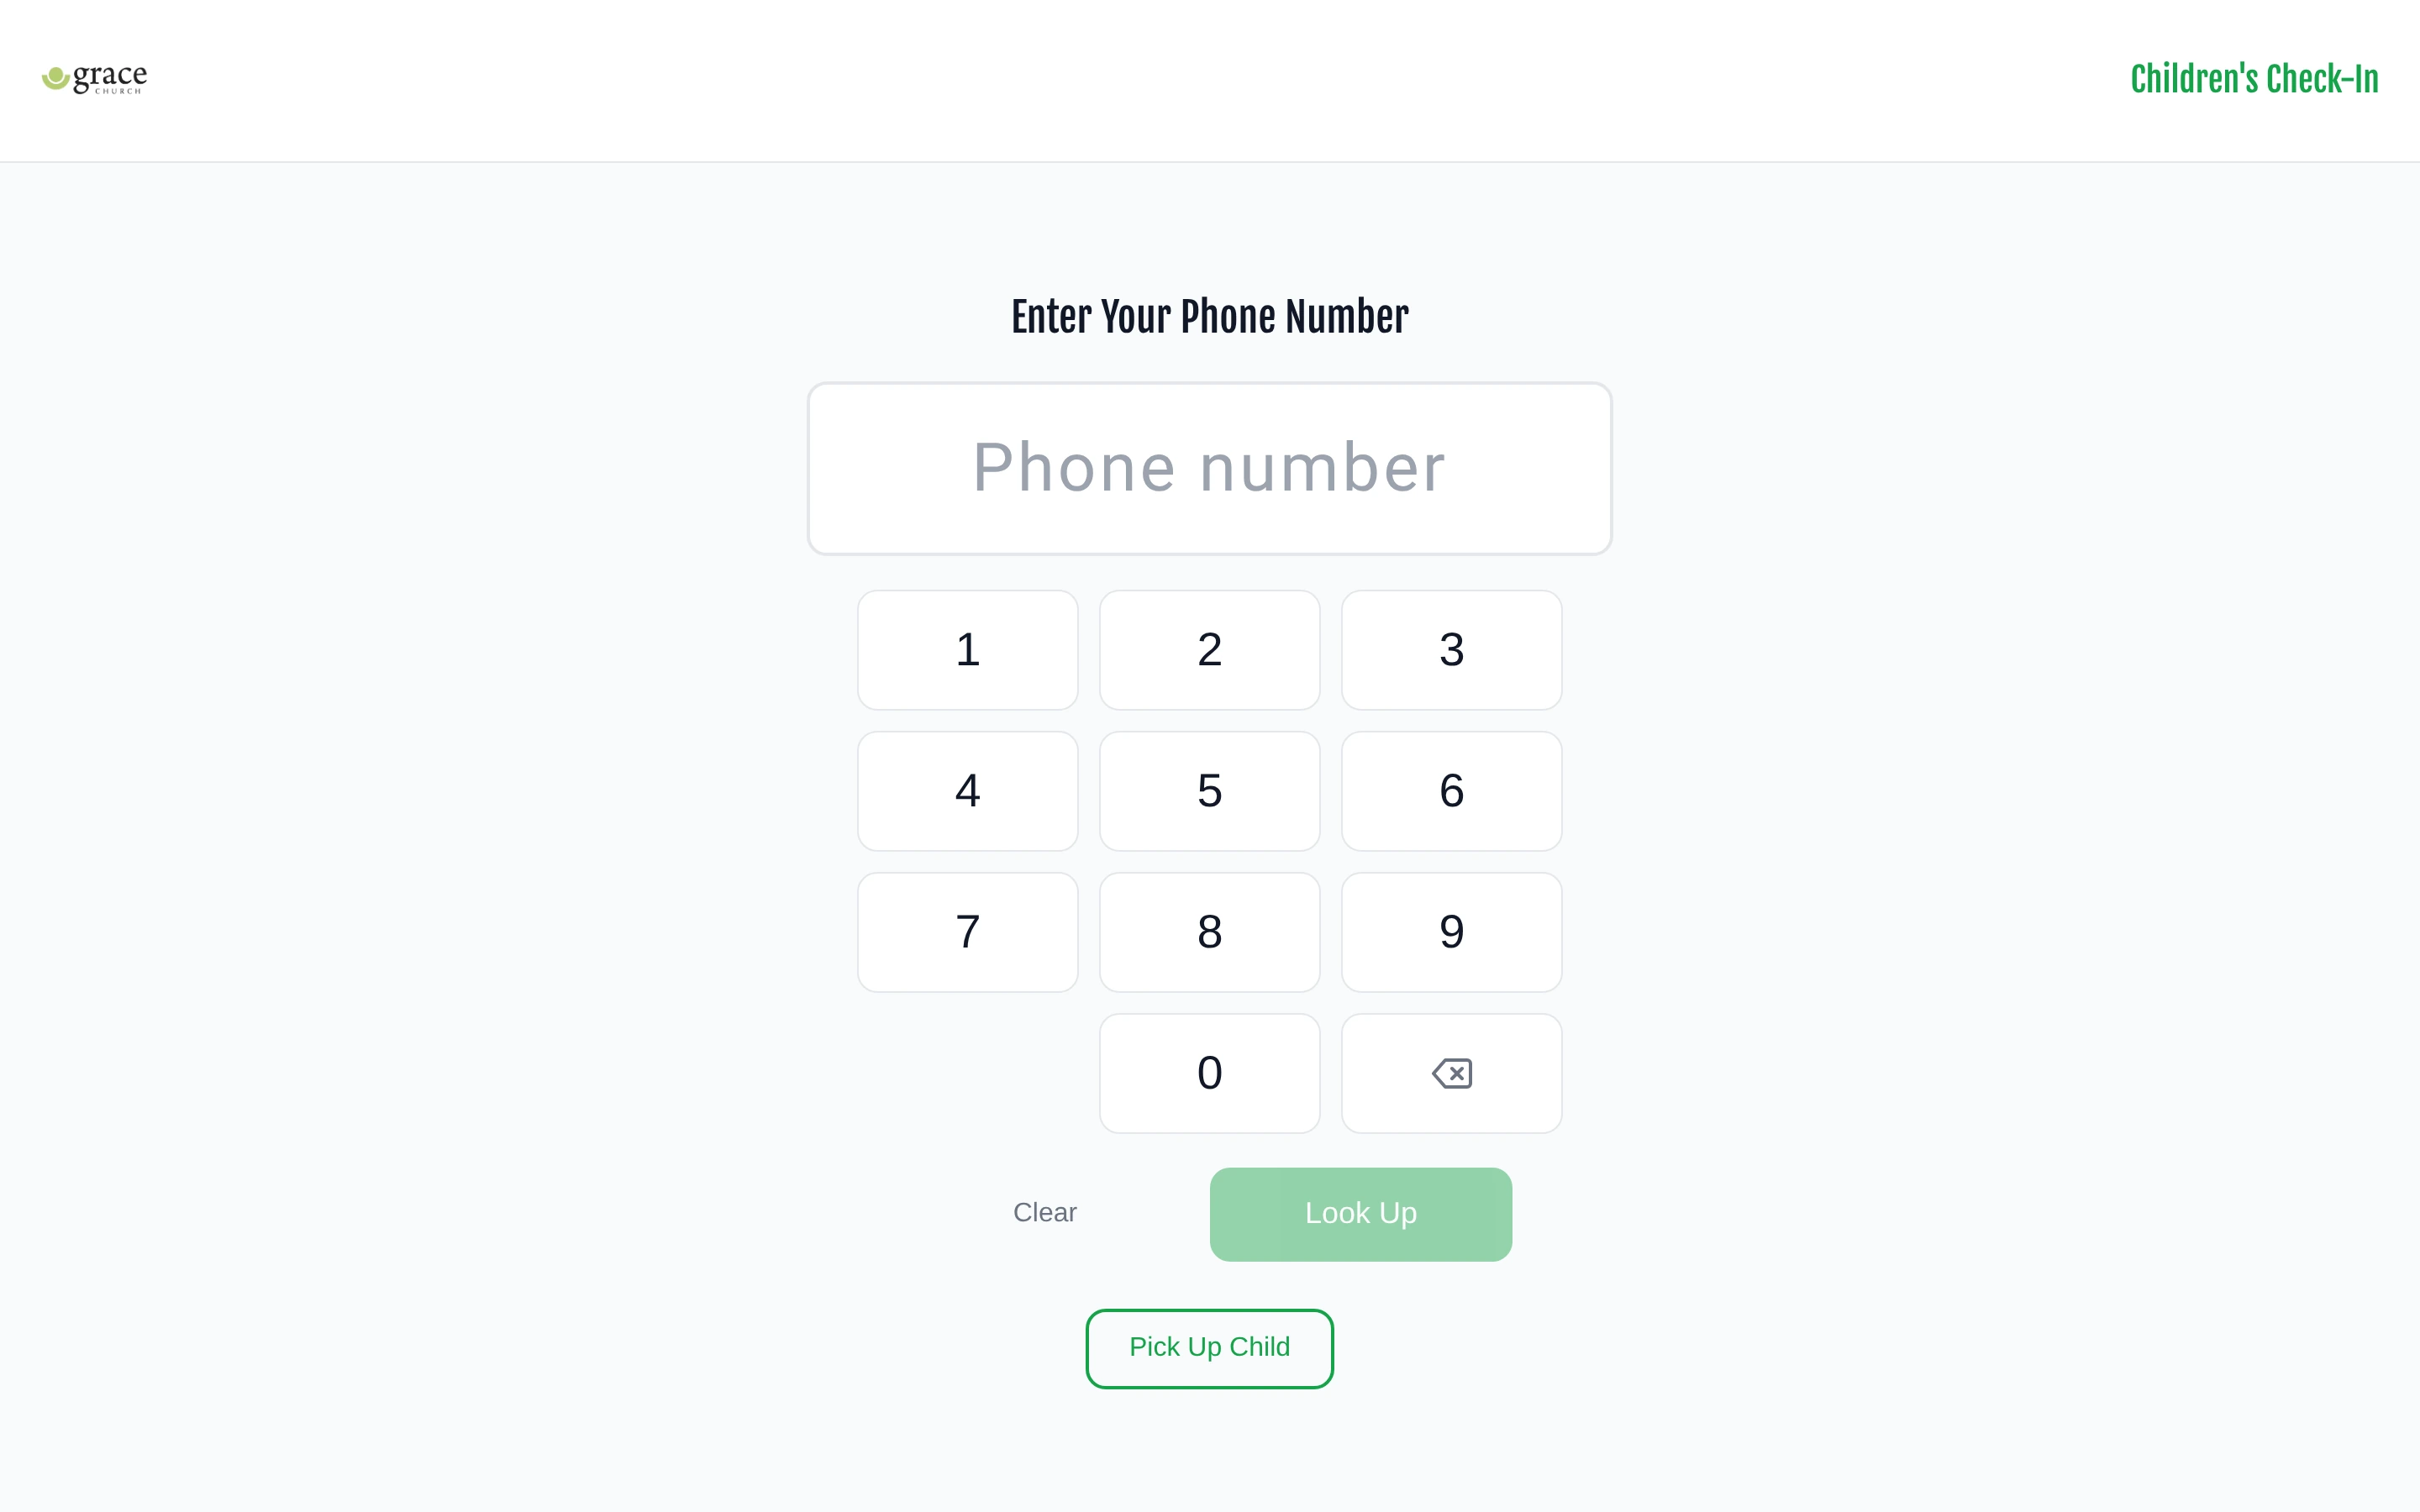
Step 1 — Enter phone number. The parent taps their 10-digit mobile number on the on-screen keypad and taps Look Up.
Step 2 — Select children. Their children appear on screen. The parent taps each child they are checking in today. Children with allergies on file show an ALLERGIES badge.
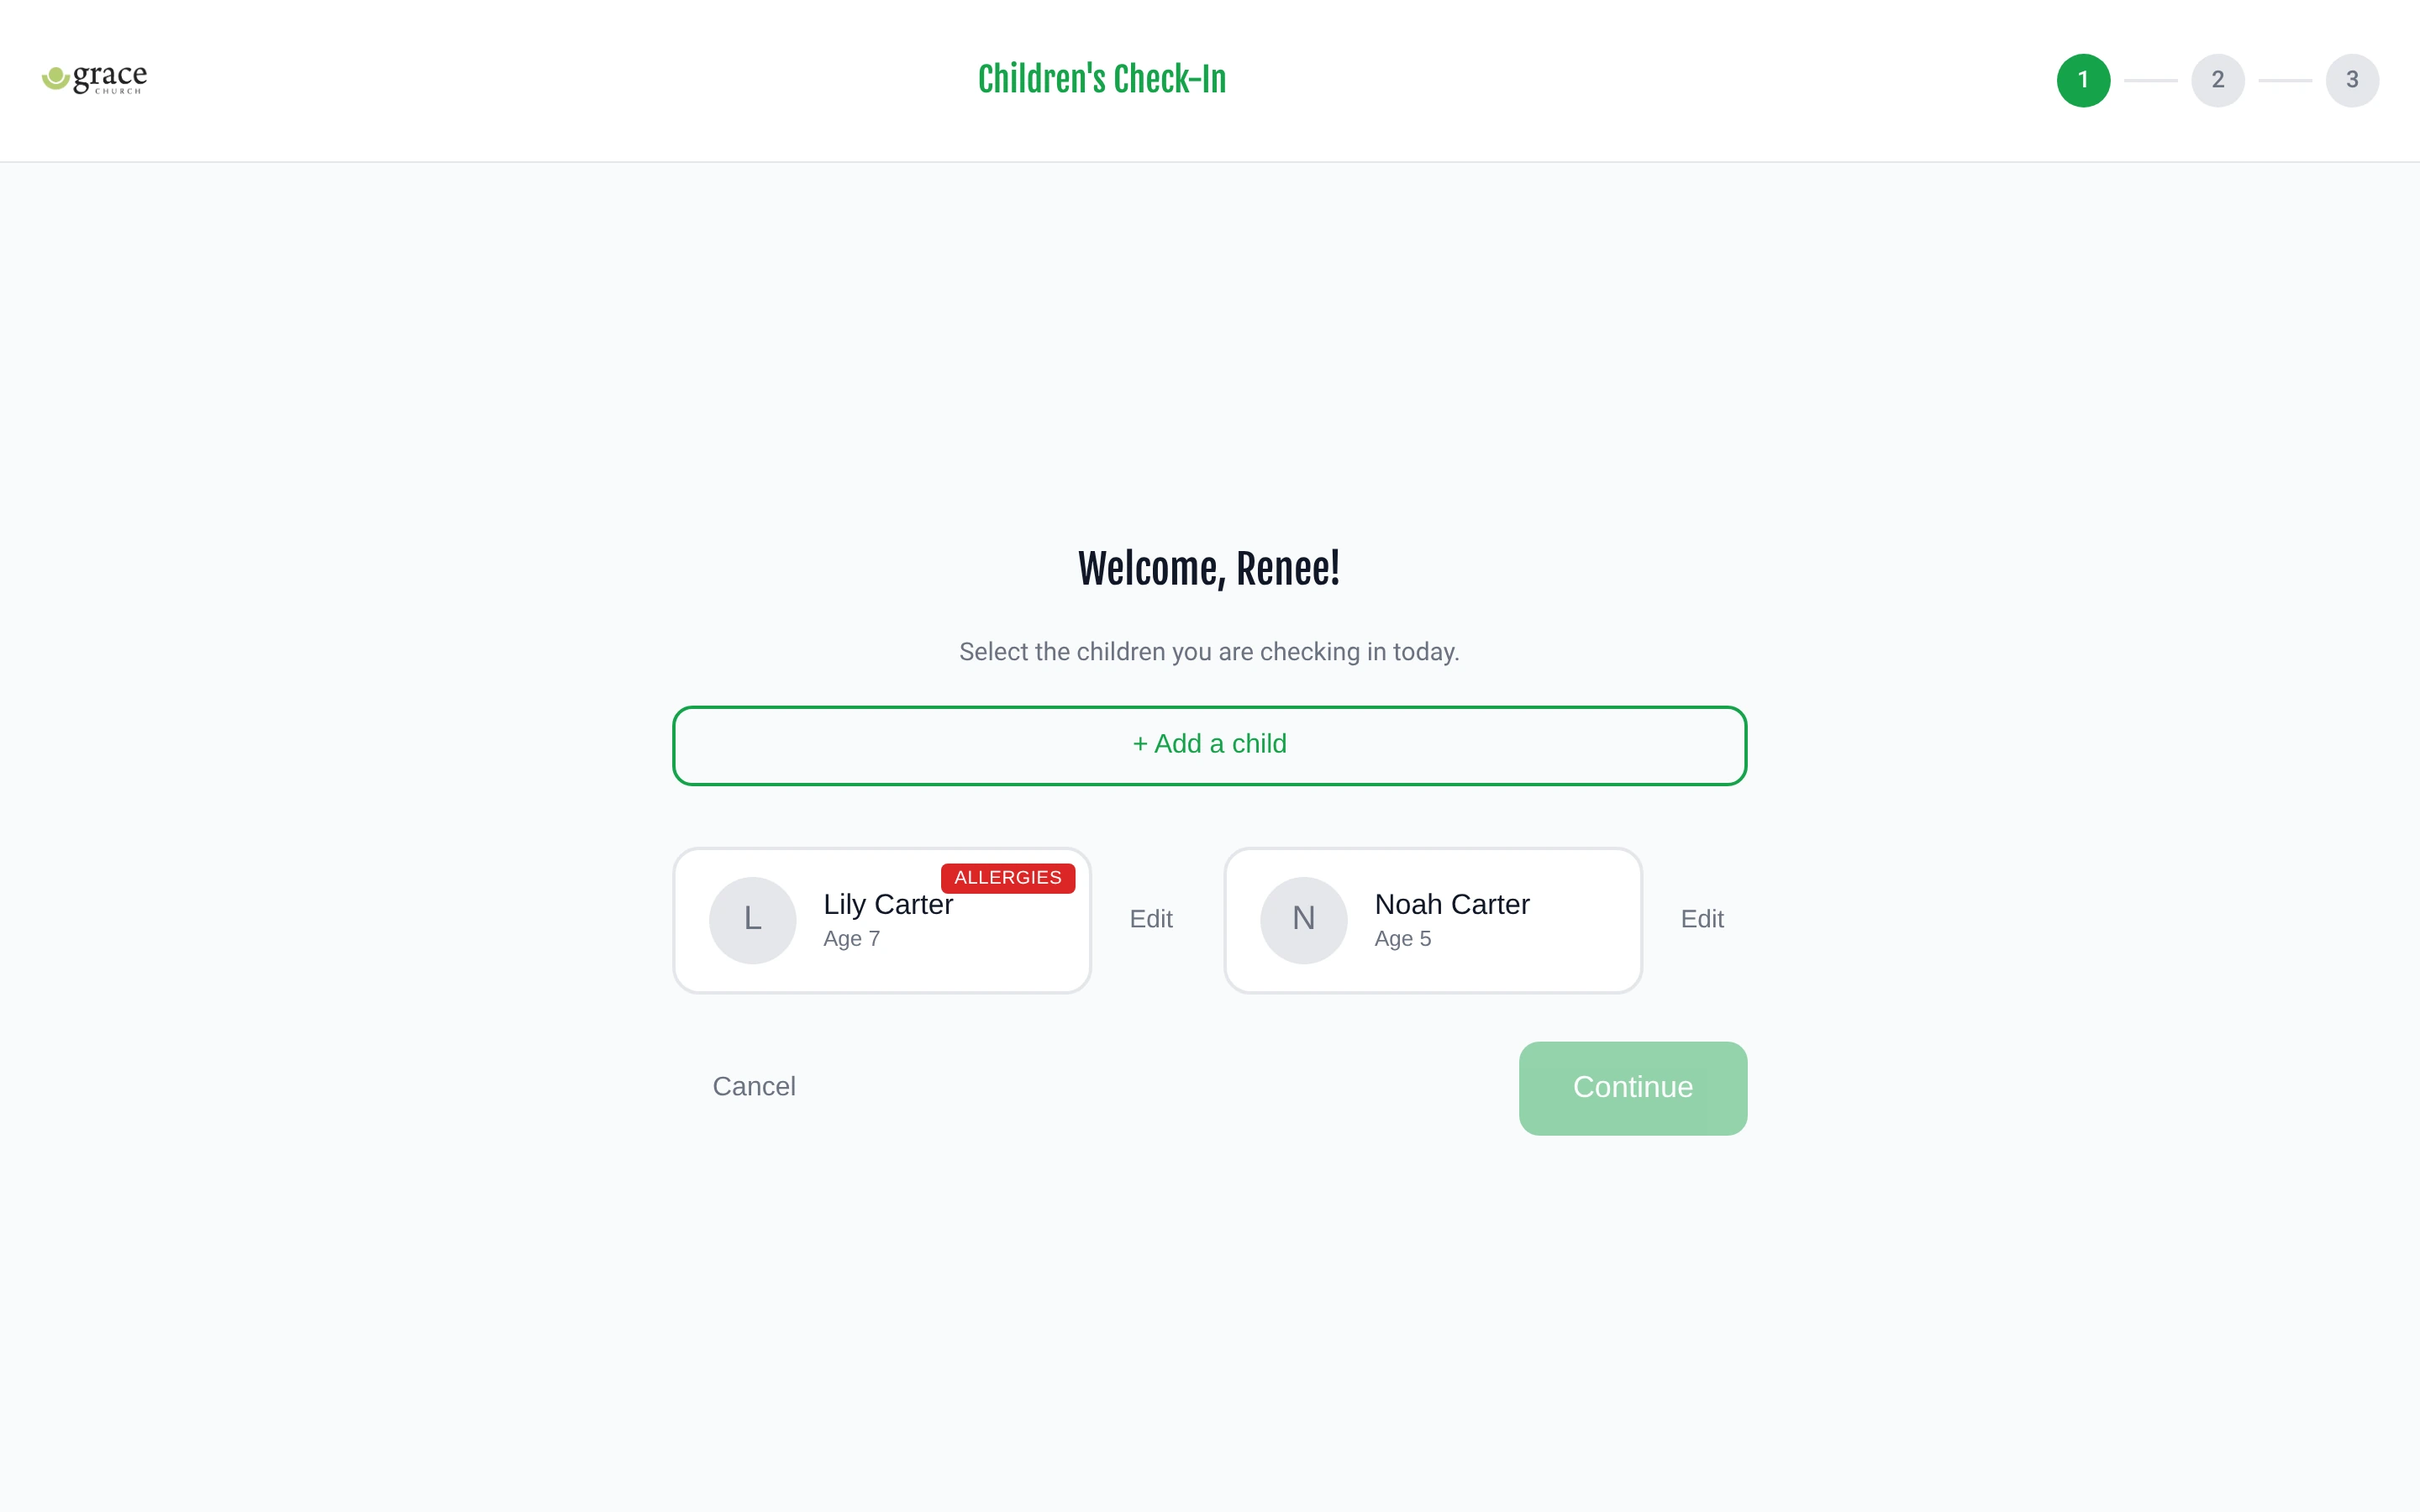
- To update a child's information (name, date of birth, grade, allergies), tap the Edit icon next to that child.
- To add a child not yet in the system, tap + Add a child and enter the child's details.
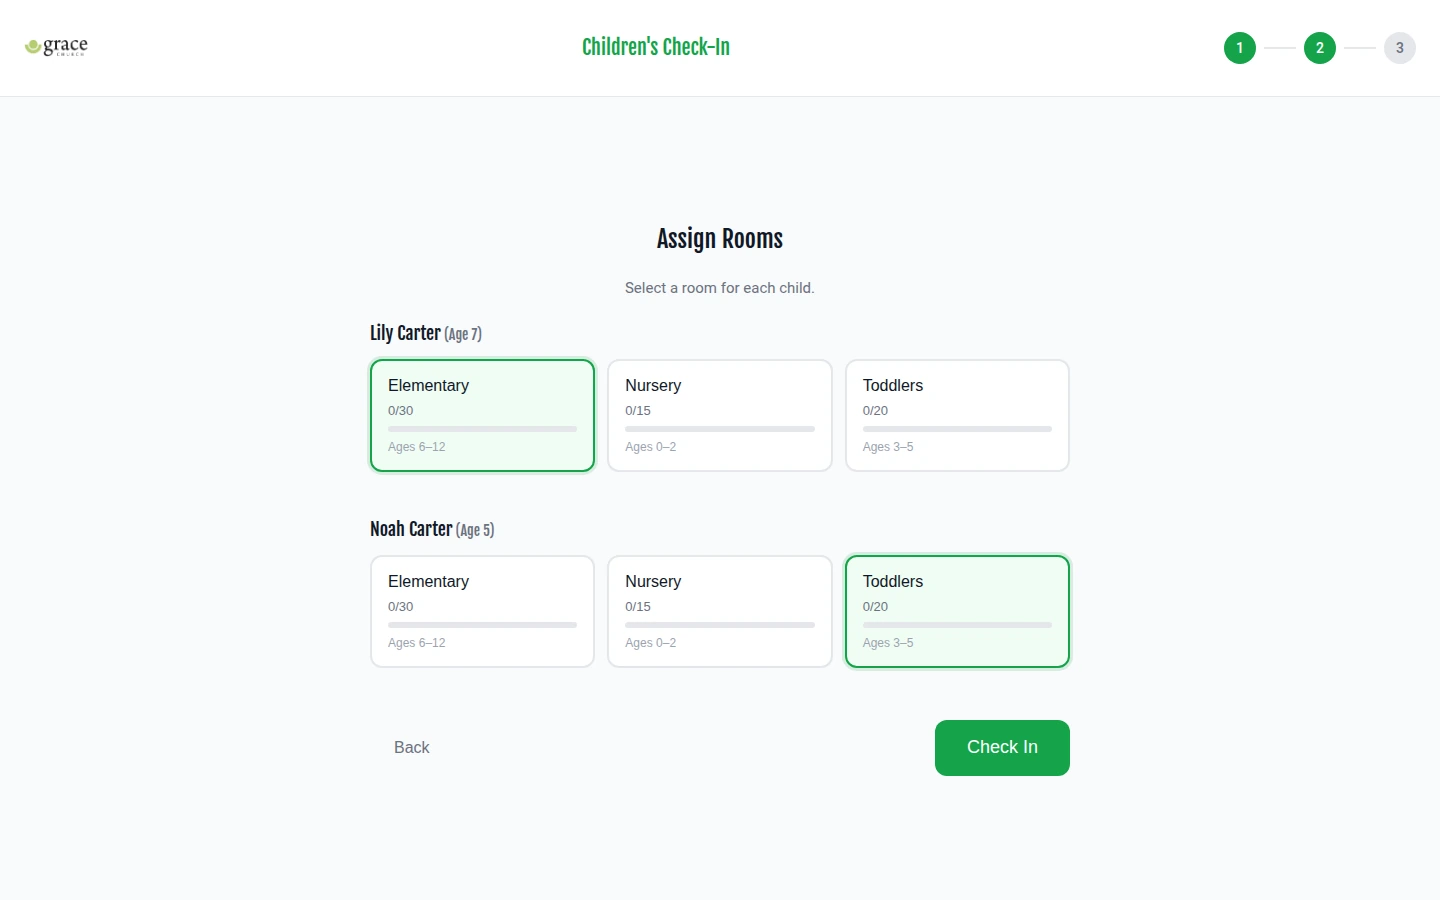
Step 3 — Confirm rooms. Passport suggests a room for each child based on their age. The parent can select a different room if needed.
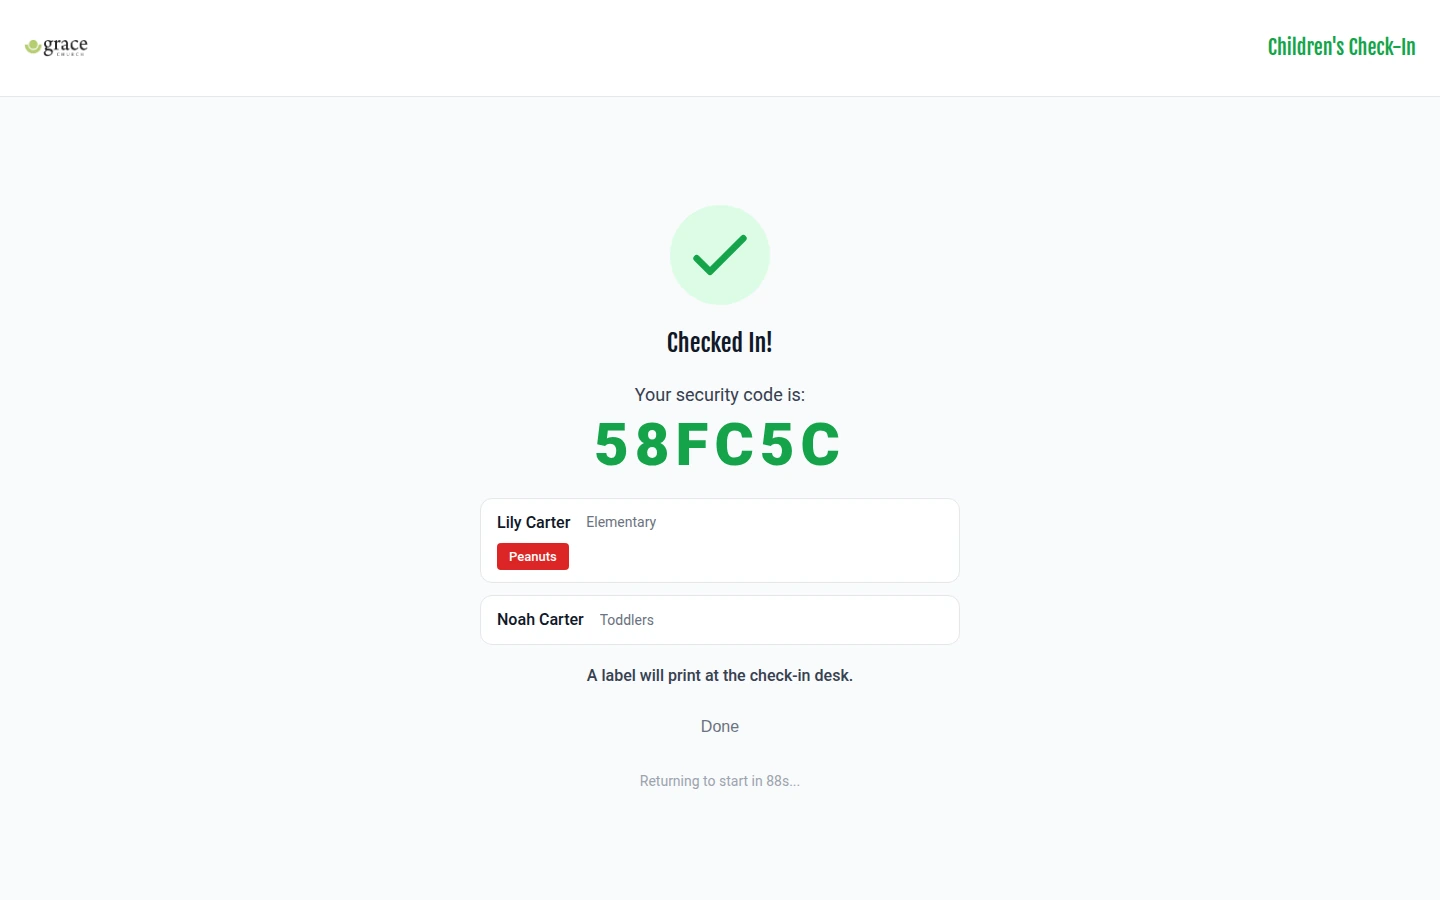
Step 4 — Security code. After check-in, a security code appears on screen. The parent should remember it — they will need it at pickup. The screen automatically resets after 90 seconds.
First-time families
If a parent's phone number is not found, the kiosk starts a short registration flow:
- The parent enters their name, email, and address.
- They can optionally add a second guardian.
- They add each child's name, date of birth, grade, and any allergies or medical notes.
- After registration, the family is added to Passport and check-in completes.
Checking out children at the kiosk
Parents can use the kiosk to pick up their children themselves:
- Tap Pick Up Child on the kiosk home screen.
- Enter the security code issued at check-in using the on-screen keypad.
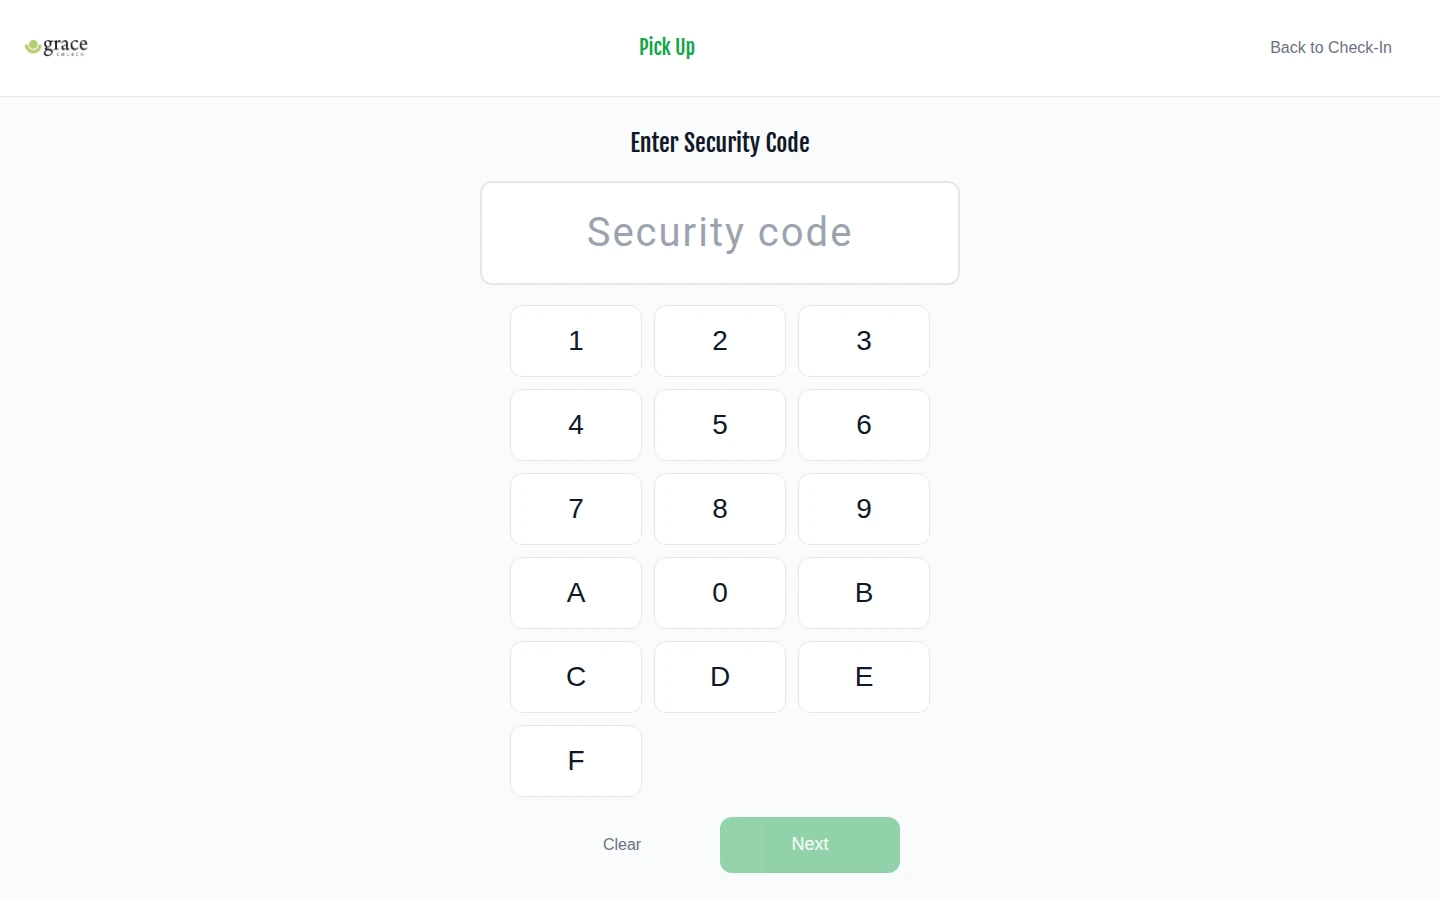
- Tap Next, then verify your phone number.
- Passport records the checkout and shows the children who were checked out.
Staff check-in (from the admin dashboard)
When a parent needs help, a staff member can check in children directly from the admin dashboard without going to the kiosk.
- Go to Events & Attendance → Children's Check-In.
- Click + Check in child in the top right.
- Search for the family by name or phone. Results appear as you type.
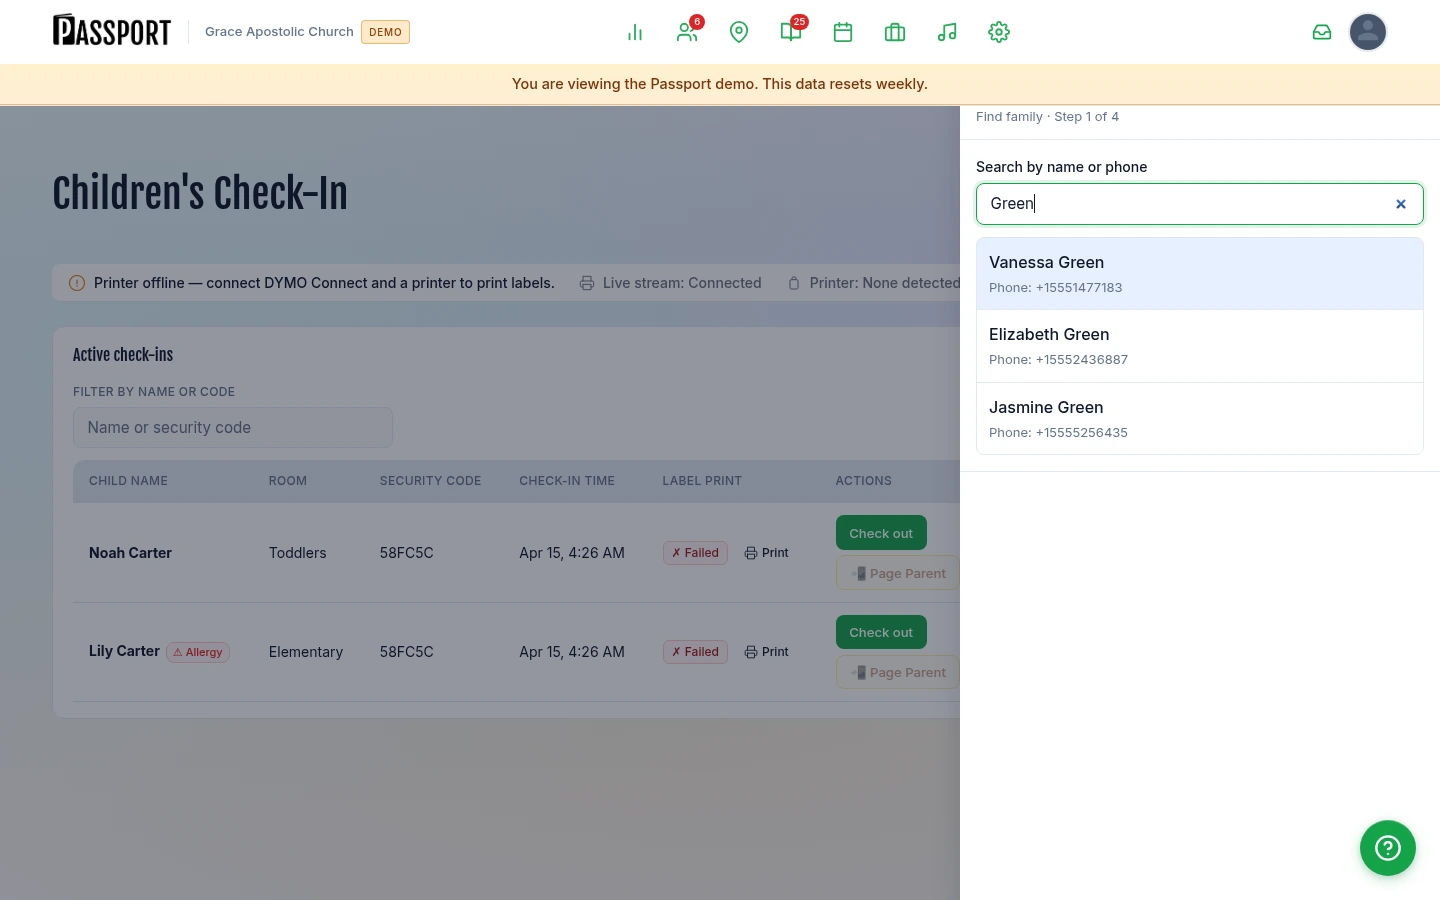
- Select the family from the list.
- Choose which children to check in by ticking the checkboxes next to their names.
- Assign a room to each child. Passport suggests the best-fit room based on age.
- Click Check in. A confirmation screen shows the security code.
Monitoring active check-ins
The dashboard at Events & Attendance → Children's Check-In shows all children currently checked in.
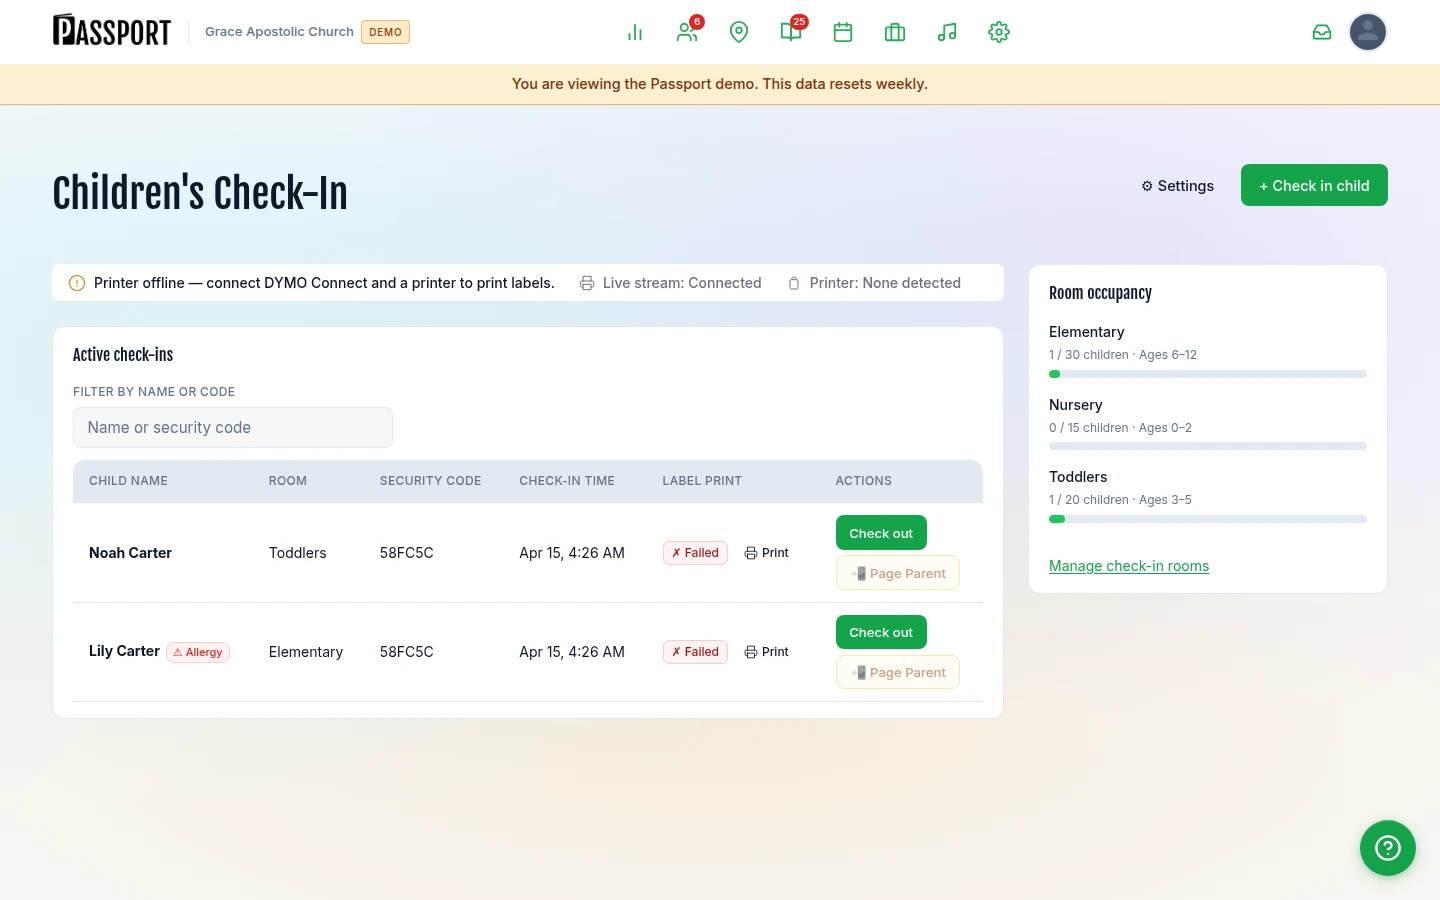
| Column | What it shows |
|---|---|
| Child name | Full name, with an Allergy or Medical badge if notes are on file |
| Room | The room the child was assigned to |
| Security code | The unique code issued at check-in |
| Check-in time | The time the child was checked in |
| Label print | Print status badge and reprint button (if label printing is active) |
| Actions | Check out and Page Parent buttons |
The dashboard automatically refreshes every 30 seconds. You can also filter the list by name or security code using the search field.
Room occupancy
The Room occupancy panel on the right shows a capacity bar for each room. The bar turns yellow when a room is getting full and red when it is at capacity. Click Manage check-in rooms to adjust room settings.
Recent check-outs
When children have been checked out in the last two hours, a Recent check-outs section appears above the active check-ins table. Use the filter to search by name or security code.
Checking out a child (from the dashboard)
Staff can check out a child without needing the security code:
- Find the child in the Active check-ins table.
- Click Check out in the Actions column.
- The child is immediately moved to the Recent check-outs list.
Paging a parent by SMS
If you need a parent to come to the children's area, you can send them an SMS from the dashboard.
- Find the child in the Active check-ins table.
- Click 📲 Page Parent in the Actions column.
- Passport sends an SMS to the parent's phone number on file.
The button shows the status of the last page:
- ✓ Sent — The message was sent successfully, with the time.
- ⋯ Pending — The message is in the queue.
- ✗ Failed — The message did not send. Check your SMS paging settings.
SMS paging must be enabled in Settings before the Page Parent button becomes active. See SMS paging settings below.
SMS paging settings
- On the Children's Check-In dashboard, click ⚙ Settings in the top right.
- Configure the options:
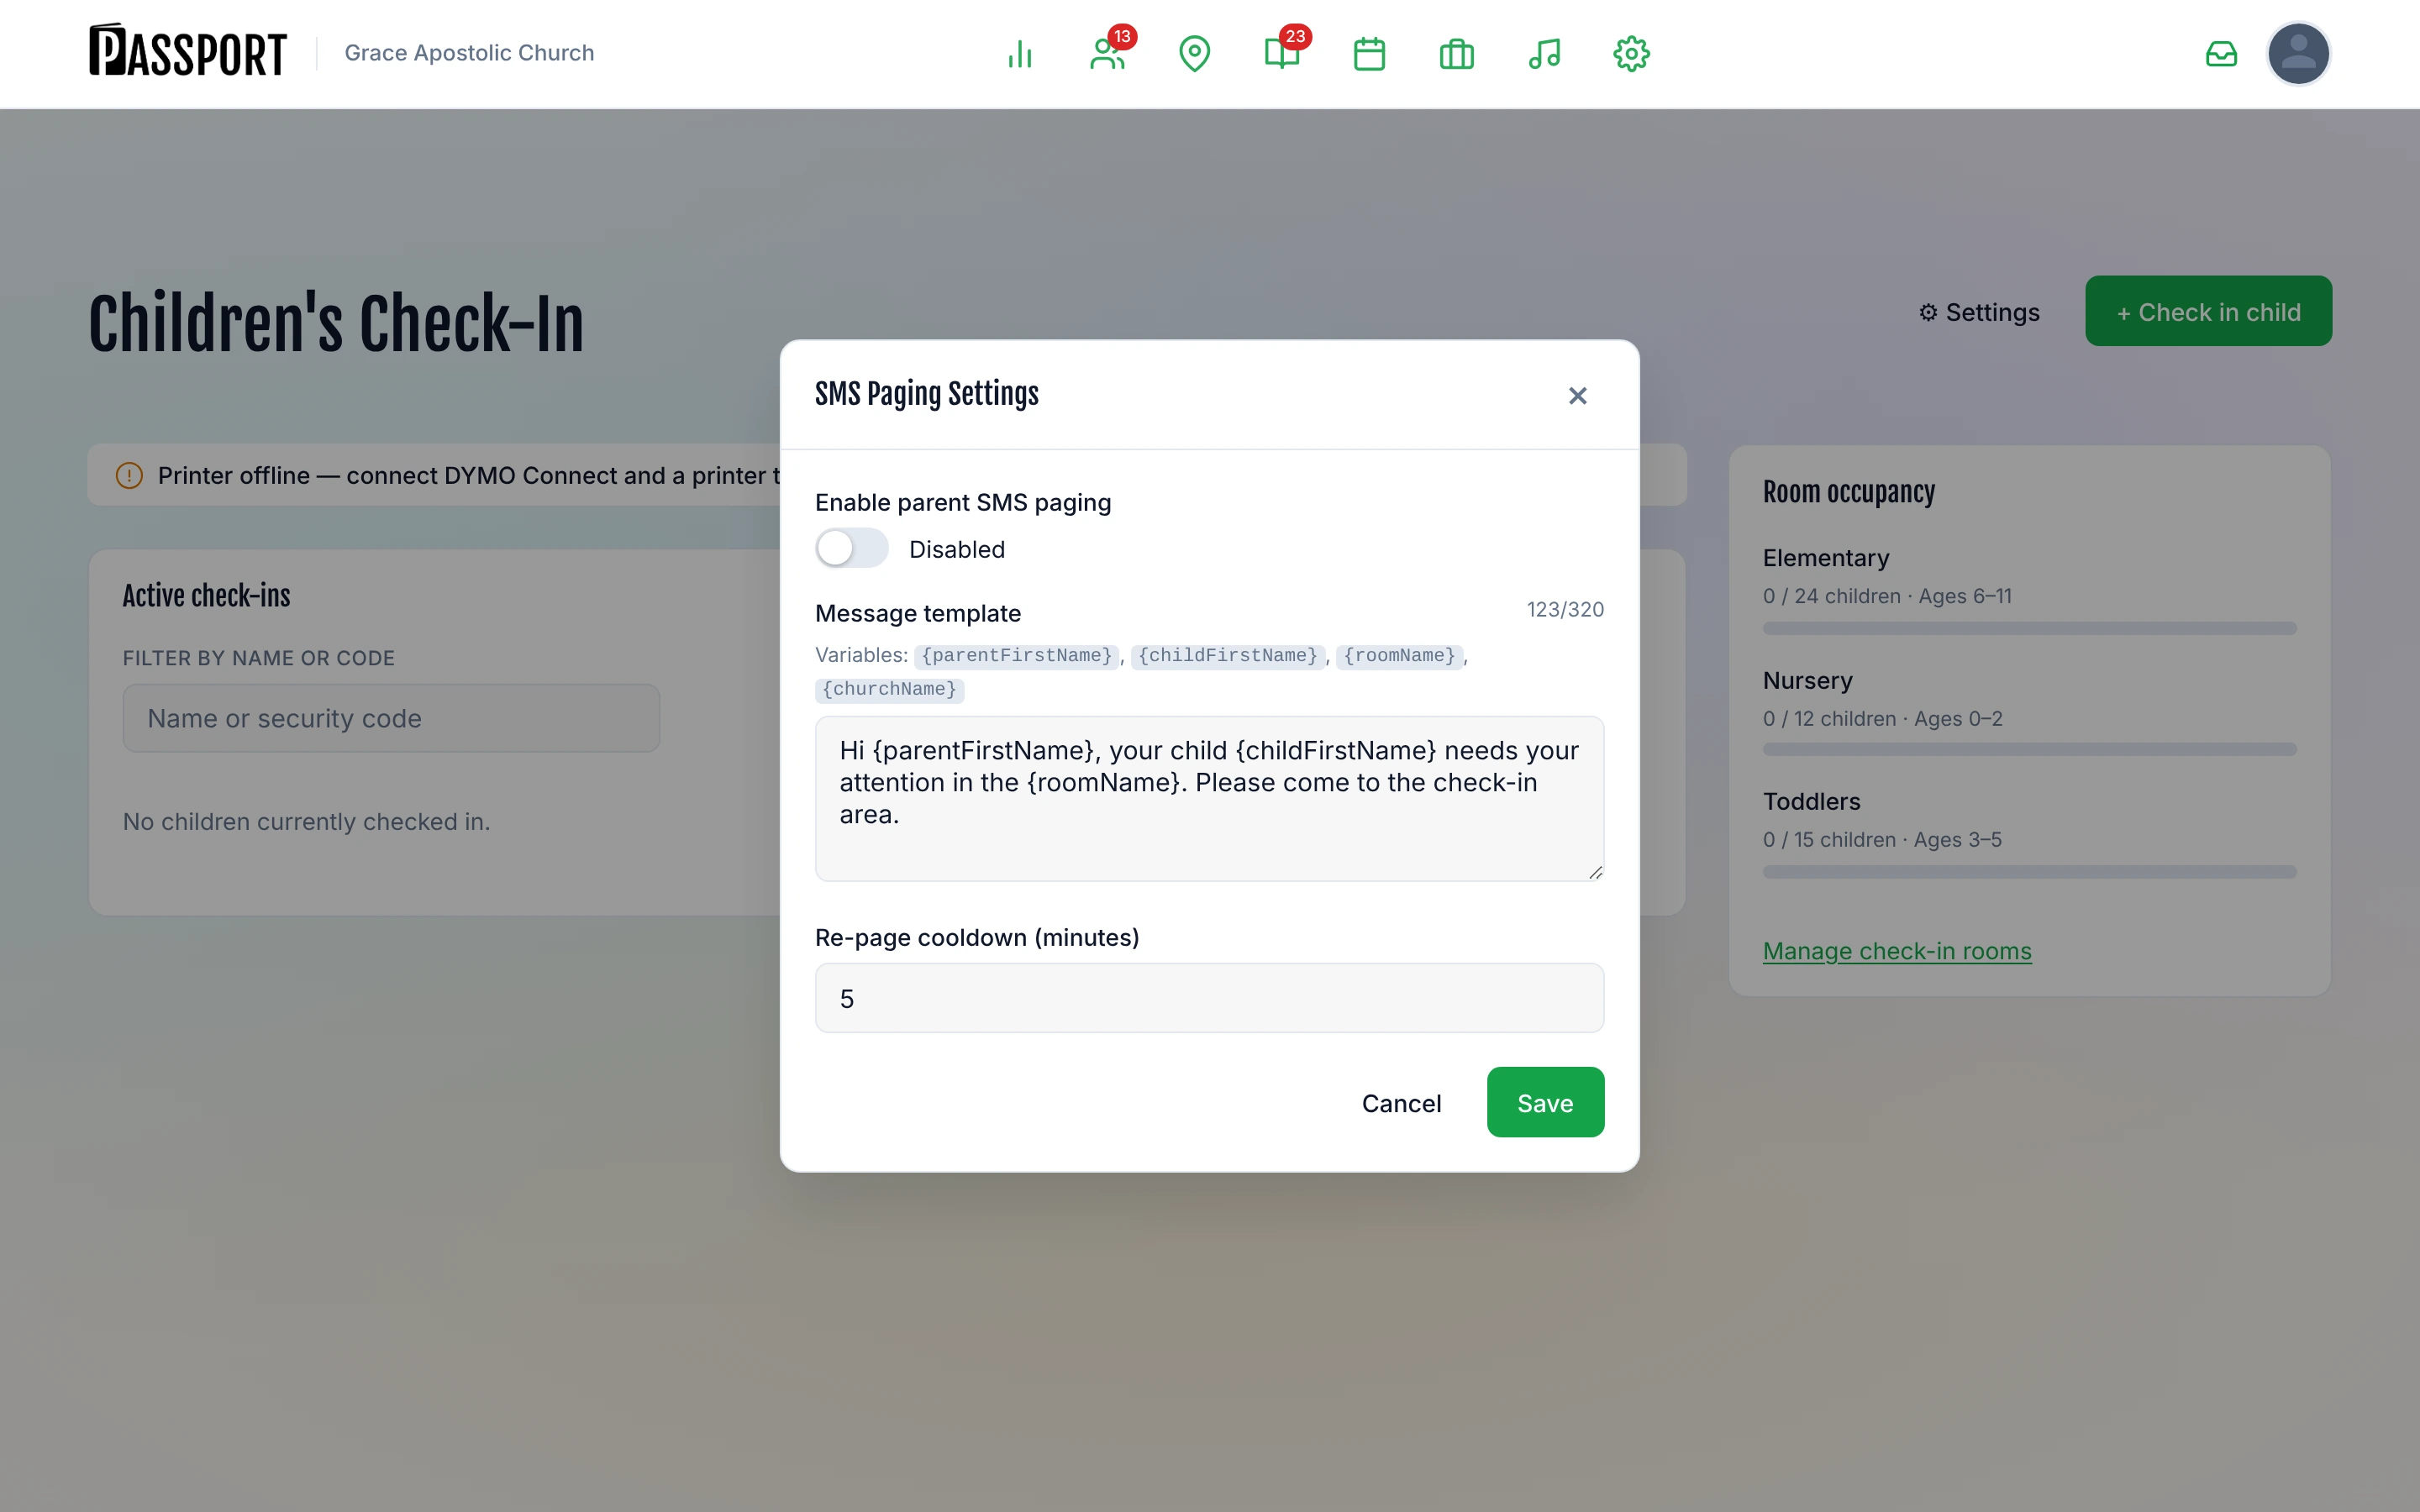
| Setting | Description |
|---|---|
| Enable parent SMS paging | Toggle SMS paging on or off for your church. When off, the Page Parent button is disabled. |
| Message template | The text sent to the parent. Use the variables below to personalize it. Maximum 320 characters. |
| Re-page cooldown | How many minutes must pass before the same parent can be paged again (1–60 minutes). Prevents accidental duplicate messages. |
- Click Save.
Template variables
Use these placeholders in the message template. Passport replaces them with real values when the message is sent.
| Variable | Replaced with |
|---|---|
{parentFirstName} | The parent's first name |
{childFirstName} | The child's first name |
{roomName} | The name of the room the child is in |
{churchName} | Your church name |
Example template:
Hi {parentFirstName}, your child {childFirstName} needs your attention in {roomName}. Please come to the check-in area. — {churchName}
Label printing
If your church uses a DYMO label printer with Passport, the dashboard shows a Print status bar at the top of the active check-ins panel.
- The status bar shows whether the printer is Connected, Offline, or Reconnecting.
- Each active check-in row has a label print badge and a Print button.
- Click Print to print a name label and guardian tag for that check-in.
- If a label has already been printed, the button changes to Reprint so you can print a replacement.
Label printing requires a DYMO printer connected to the computer running the dashboard. It does not print from the kiosk device.
Next steps
- Count it as attendance — Children checked in are recorded — see Attendance Tracking.
- Get families in first — Check-in matches on household, so see People.
- Plan the rooms — Calendar & Events for services children are checked into.