Planning a Service
A plan is one service on one date — the running order, the songs, the call time, and the positions that have to be filled for it to happen. It is the thing you publish so that everybody serving on Sunday knows what Sunday is.
A plan does not make a service happen. Your recurring services already put Sunday on the calendar; a plan decorates one of those occurrences with detail.
What you can do
- Planners build a running order from songs, a sermon, prayer, notices, and their own headings.
- Planners copy a good week forward so they are not rebuilding the same skeleton every Sunday.
- Planners publish, which is the moment the plan reaches the people serving.
- Volunteers see the published order on their phone — see For Volunteers.
Step 1 — Open the plans list
Go to Services → Plans. The list shows upcoming plans with their date, service, status, and how full the roster is.
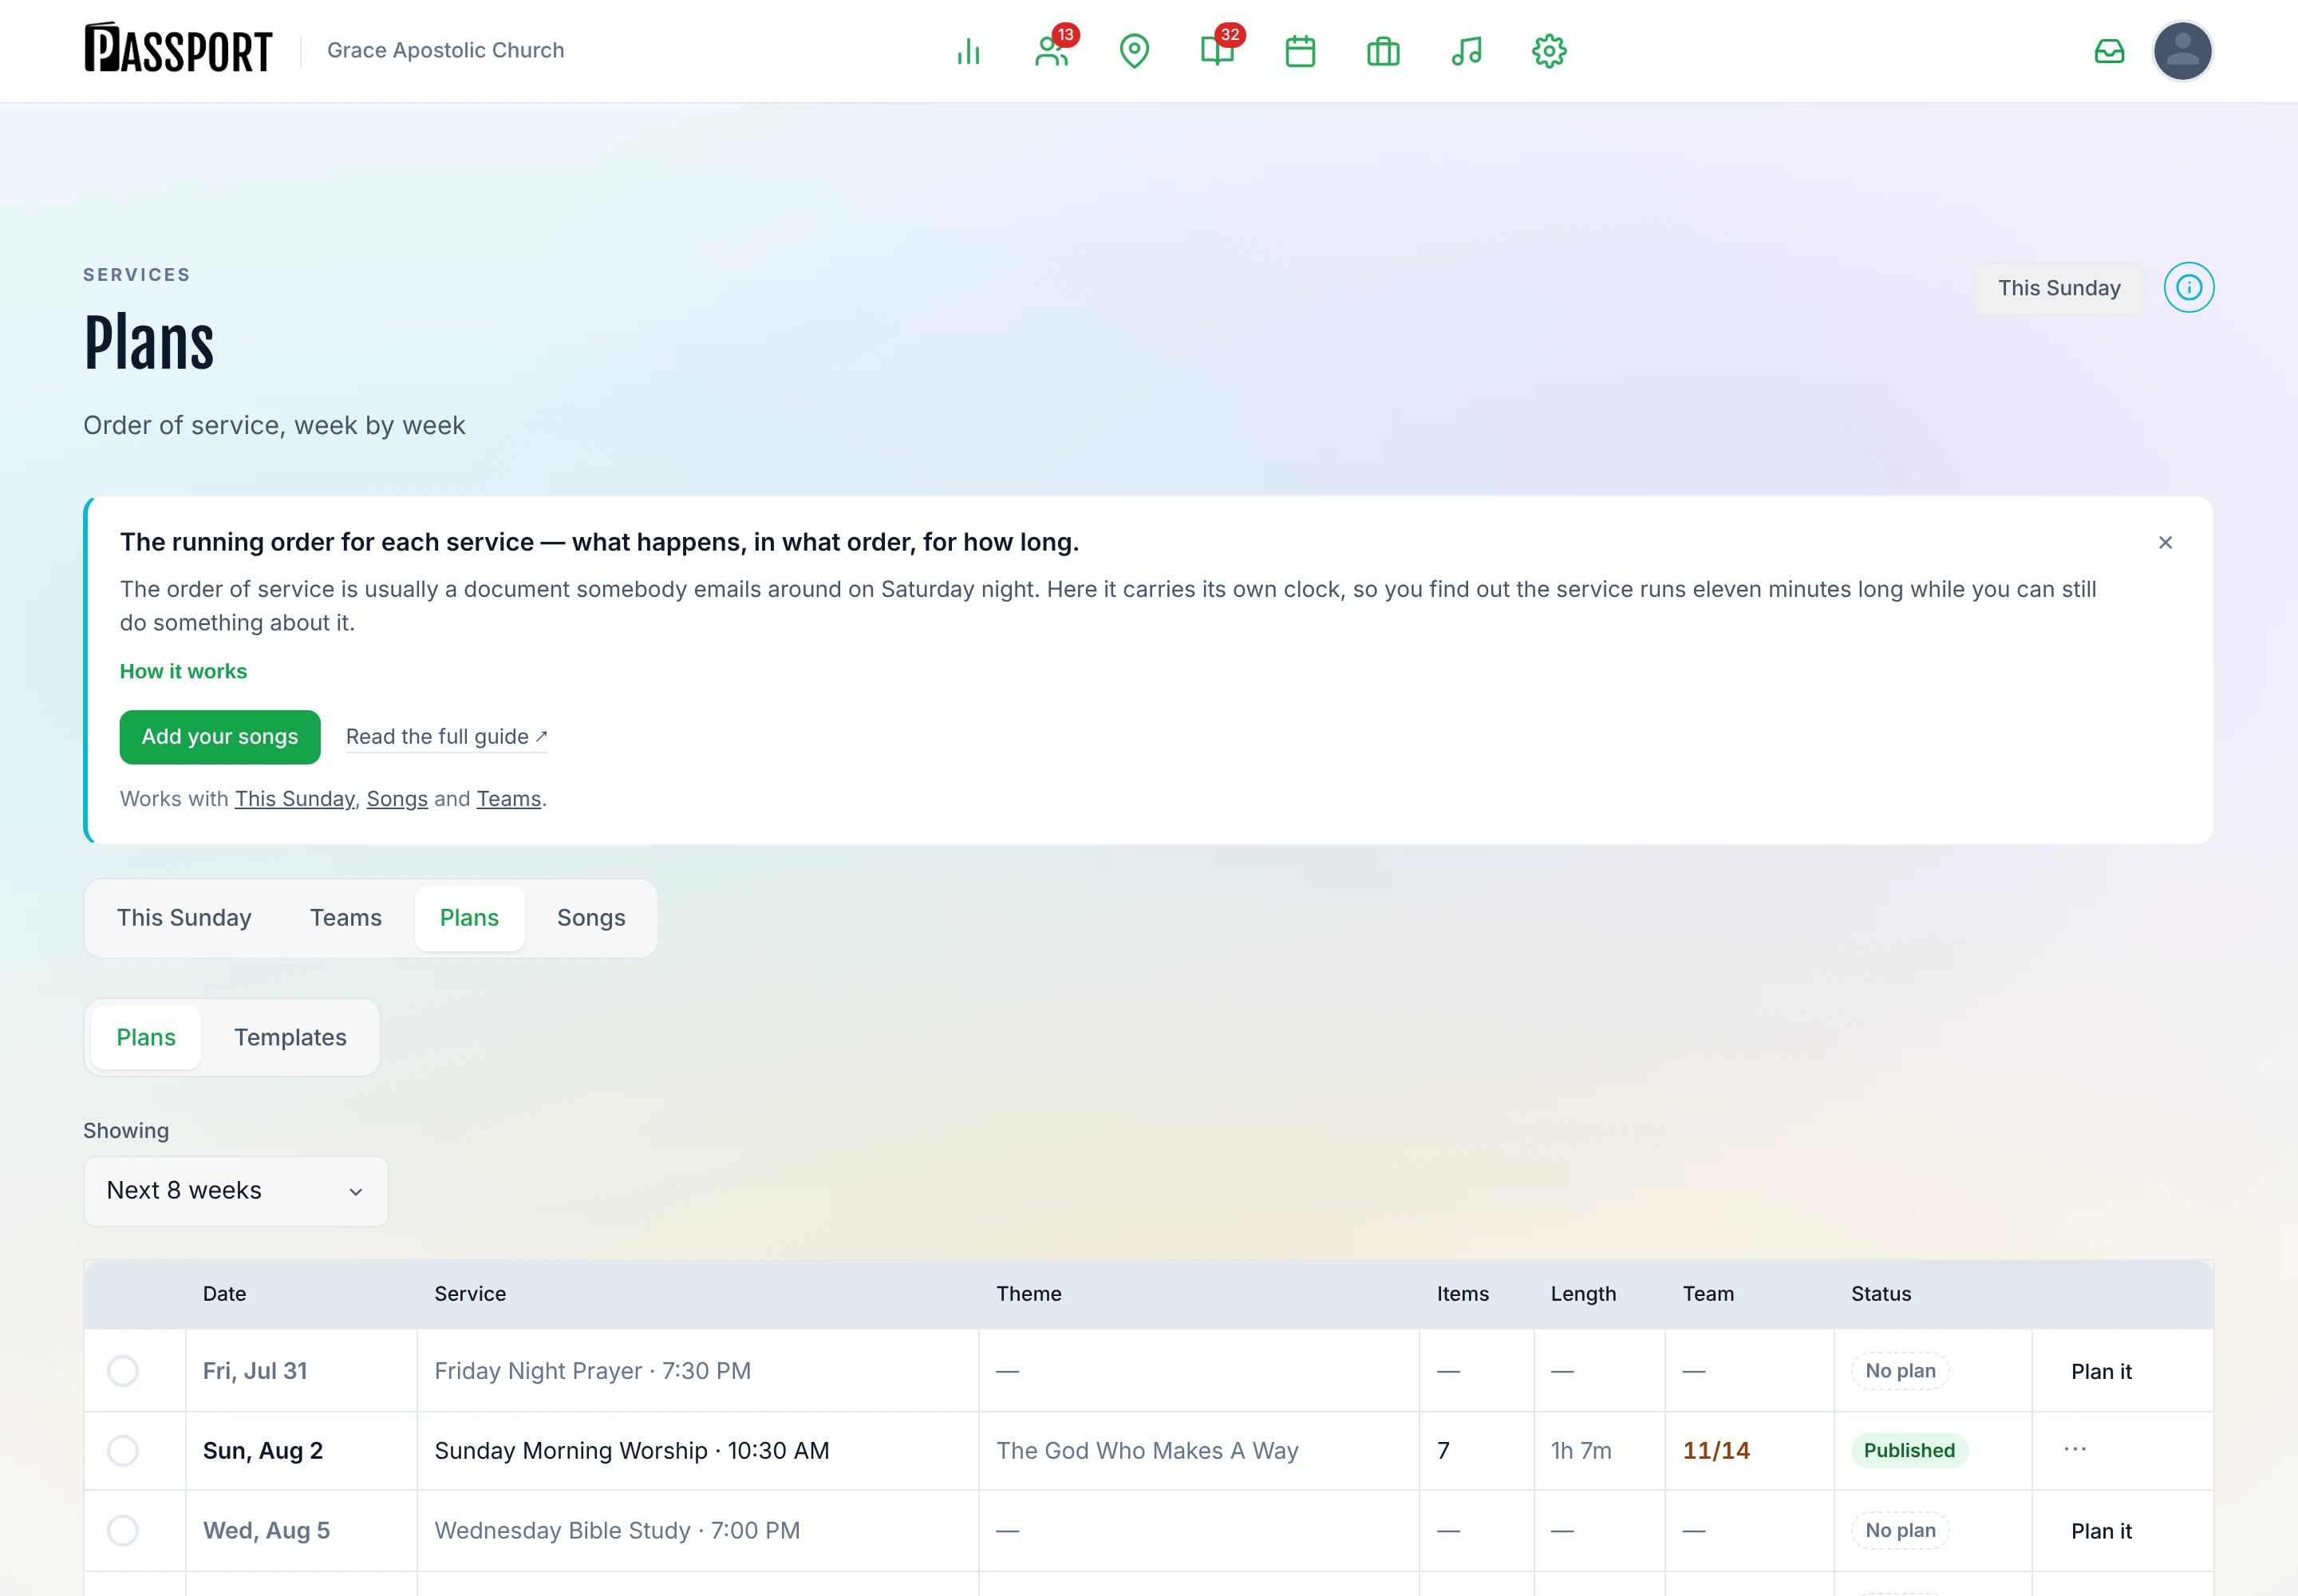
Every plan is in one of three states:
| Status | What it means |
|---|---|
| Draft | Being worked on. Volunteers cannot see it. |
| Published | Finished and visible to the people serving. |
| Cancelled | The service is not happening. Kept so the record is honest. |
A date with no plan is still a row. Every upcoming occurrence of every service is listed, whether or not anybody has planned it — the missing plan is the reason to open this page. A date with nothing on it reads No plan, and the button on the row is Plan it. Clicking it creates the plan, with its positions already copied in from that service's staffing template, and opens the editor on it.
To create a batch rather than one at a time, use Services → Teams. When the grid has nothing in it at all, it offers Create plans for these dates; once some plans exist, the line above the grid becomes a button reading 3 service dates have no plan yet. Both do the same thing, and it is not a selection: they create a plan for every unplanned service date in the window you are looking at, so set the week selector before you press it.
:::note One plan per service per day A plan is identified by its service and its calendar date, so you cannot end up with two plans for the same Sunday morning. If something else has created one for that date since the list was loaded, Passport refuses the second one and tells you so — refresh and the row will have become the existing plan. :::
Step 2 — Build the running order
Open a plan to get the editor. The running order is a list of items you add, reorder by dragging, and give a length to.
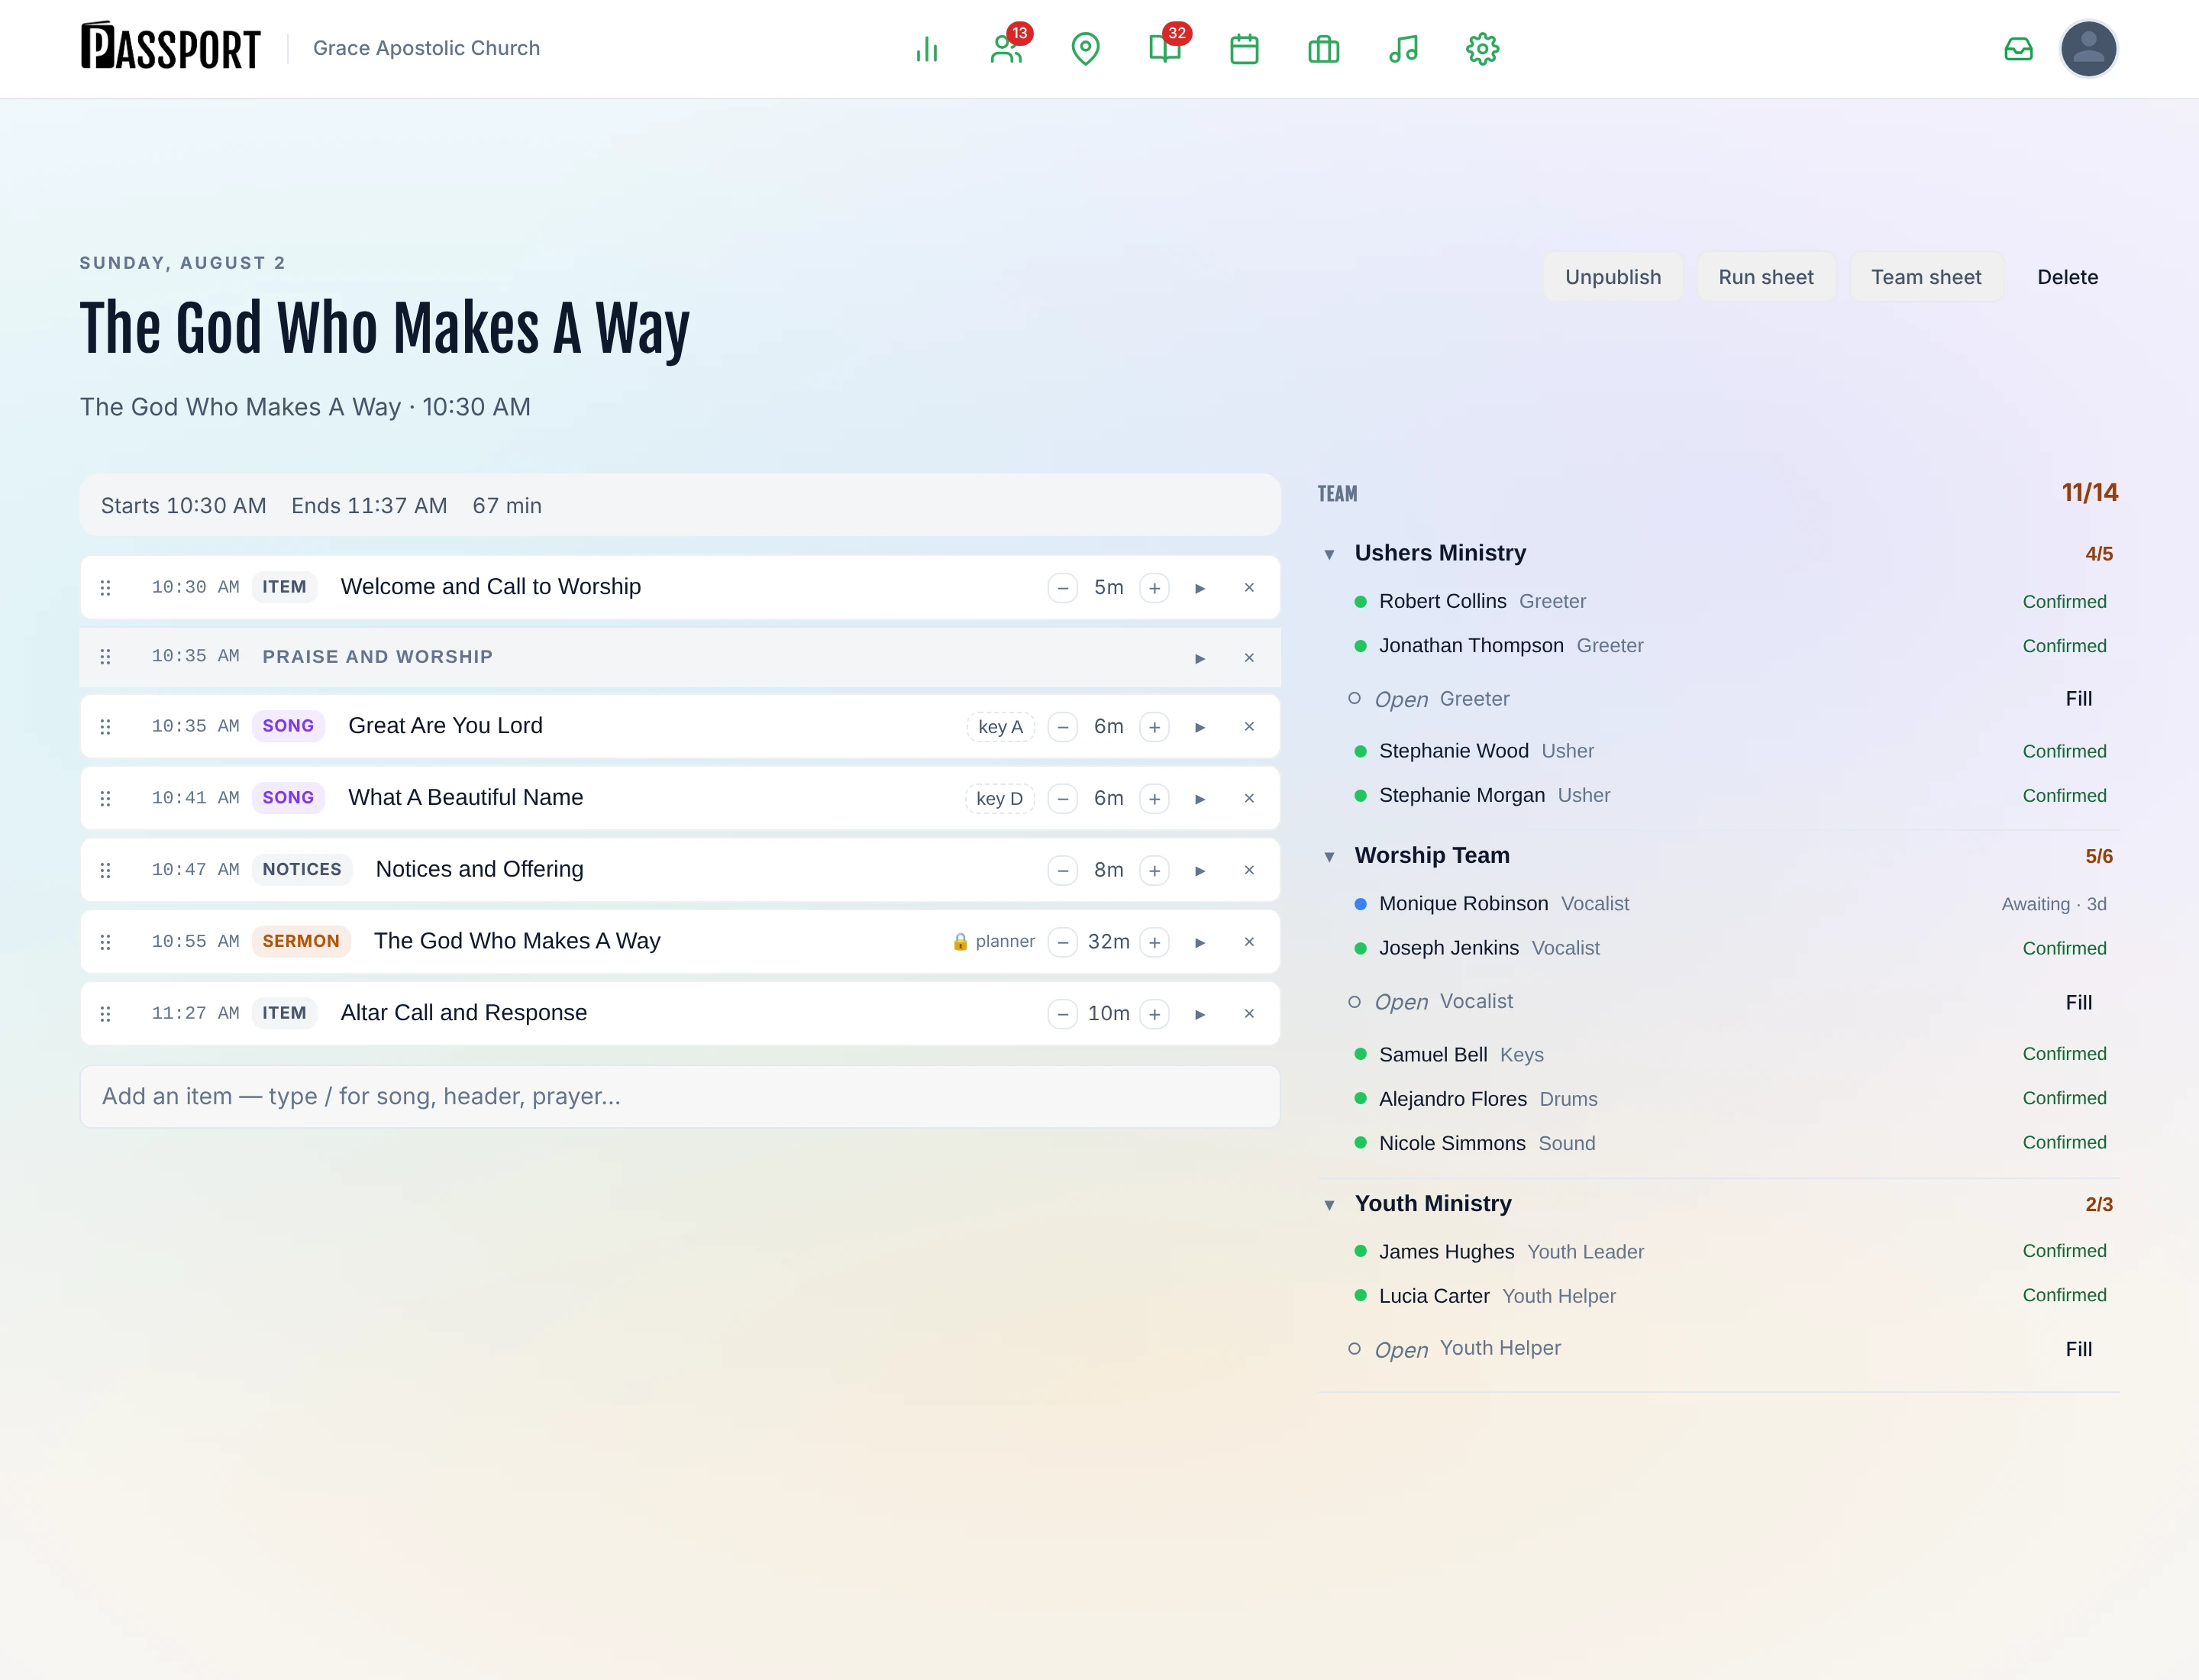
There are six kinds of item:
| Item | Use it for |
|---|---|
| Song | Something from your song library |
| Sermon | The message |
| Prayer | Opening prayer, altar call, response |
| Notices | Announcements, offering, anything read out |
| Section | A divider that groups what follows — "Praise & Worship" |
| Item | Anything else — welcome, communion, a baby dedication |
To add an item: there is no form. Type into the box at the bottom of the order, the way you would in a chat. Typing / opens a short menu — /song picks from the library, /header starts a section, and /prayer, /sermon and /notices do what they say. Anything else you type and press Enter on becomes a plain item under that title. Whatever you add lands at the bottom; drag it where it belongs.
Everything else edits in place: the title is a text field on the row, the length is a stepper, and the chevron opens the notes.
To set a song's key for this service: songs carry a key in the library, but you can override it on the plan. That is what service key is — the key you are actually playing it in on the day, which may not be the key it is filed under.
Notes, and who can read them
Every item can carry notes, and each item's notes are marked for one of two audiences:
- Planners only — stays in the office. Sermon outlines default to this.
- Team can see — goes out with the published plan. Stage cues, "come in on the second verse".
This distinction is the reason a plan can safely be shown to a volunteer at all. Check it before you publish if you have written anything on the sermon you would not want read from the platform.
:::note The clock adds itself up Give each item a length in minutes and Passport works out the rest. A bar across the top of the running order reads Starts 10:30 AM · Ends 11:37 AM · 67 min, and every item shows the time it begins — the plan's start time plus everything above it.
None of that is typed or stored, so shortening the sermon moves everything after it immediately. A header has no length of its own and reads at the same time as the item beneath it, which is what a header means. Go past ninety minutes and the bar flags the overrun. :::
Step 3 — Set the times
Three fields belong to the plan rather than to any item on it, and they sit in a bar above both columns of the editor:
- Start time — when the service begins. Until you set one the clock uses the service's usual time, which is right most weeks and wrong on the Sunday you start at 10:00 because of a baptism. Setting it moves every row in the running order, because every row's time is derived from it.
- Call time — when the team is expected, if that is earlier. This is the time volunteers see on their own copy of the plan, and it is the single most useful field on the plan for the people serving. It is also printed at the top of the team sheet.
- Notes for the team — for everybody rostered. "Call time is 9:15 in the sanctuary, black tops please". Unlike item notes there is no audience toggle on these: they always go out with the published plan, so they are not the place for anything you would not read out.
All three save themselves as you type; the header says Saving… and then Saved.
Step 4 — Copy it forward
Most weeks are the same shape. On the plans list, open a plan's actions menu and choose Duplicate to…. The dialog offers the next eight occurrences of that service; tick the dates you want and the button counts them back to you — Copy to 3 dates.
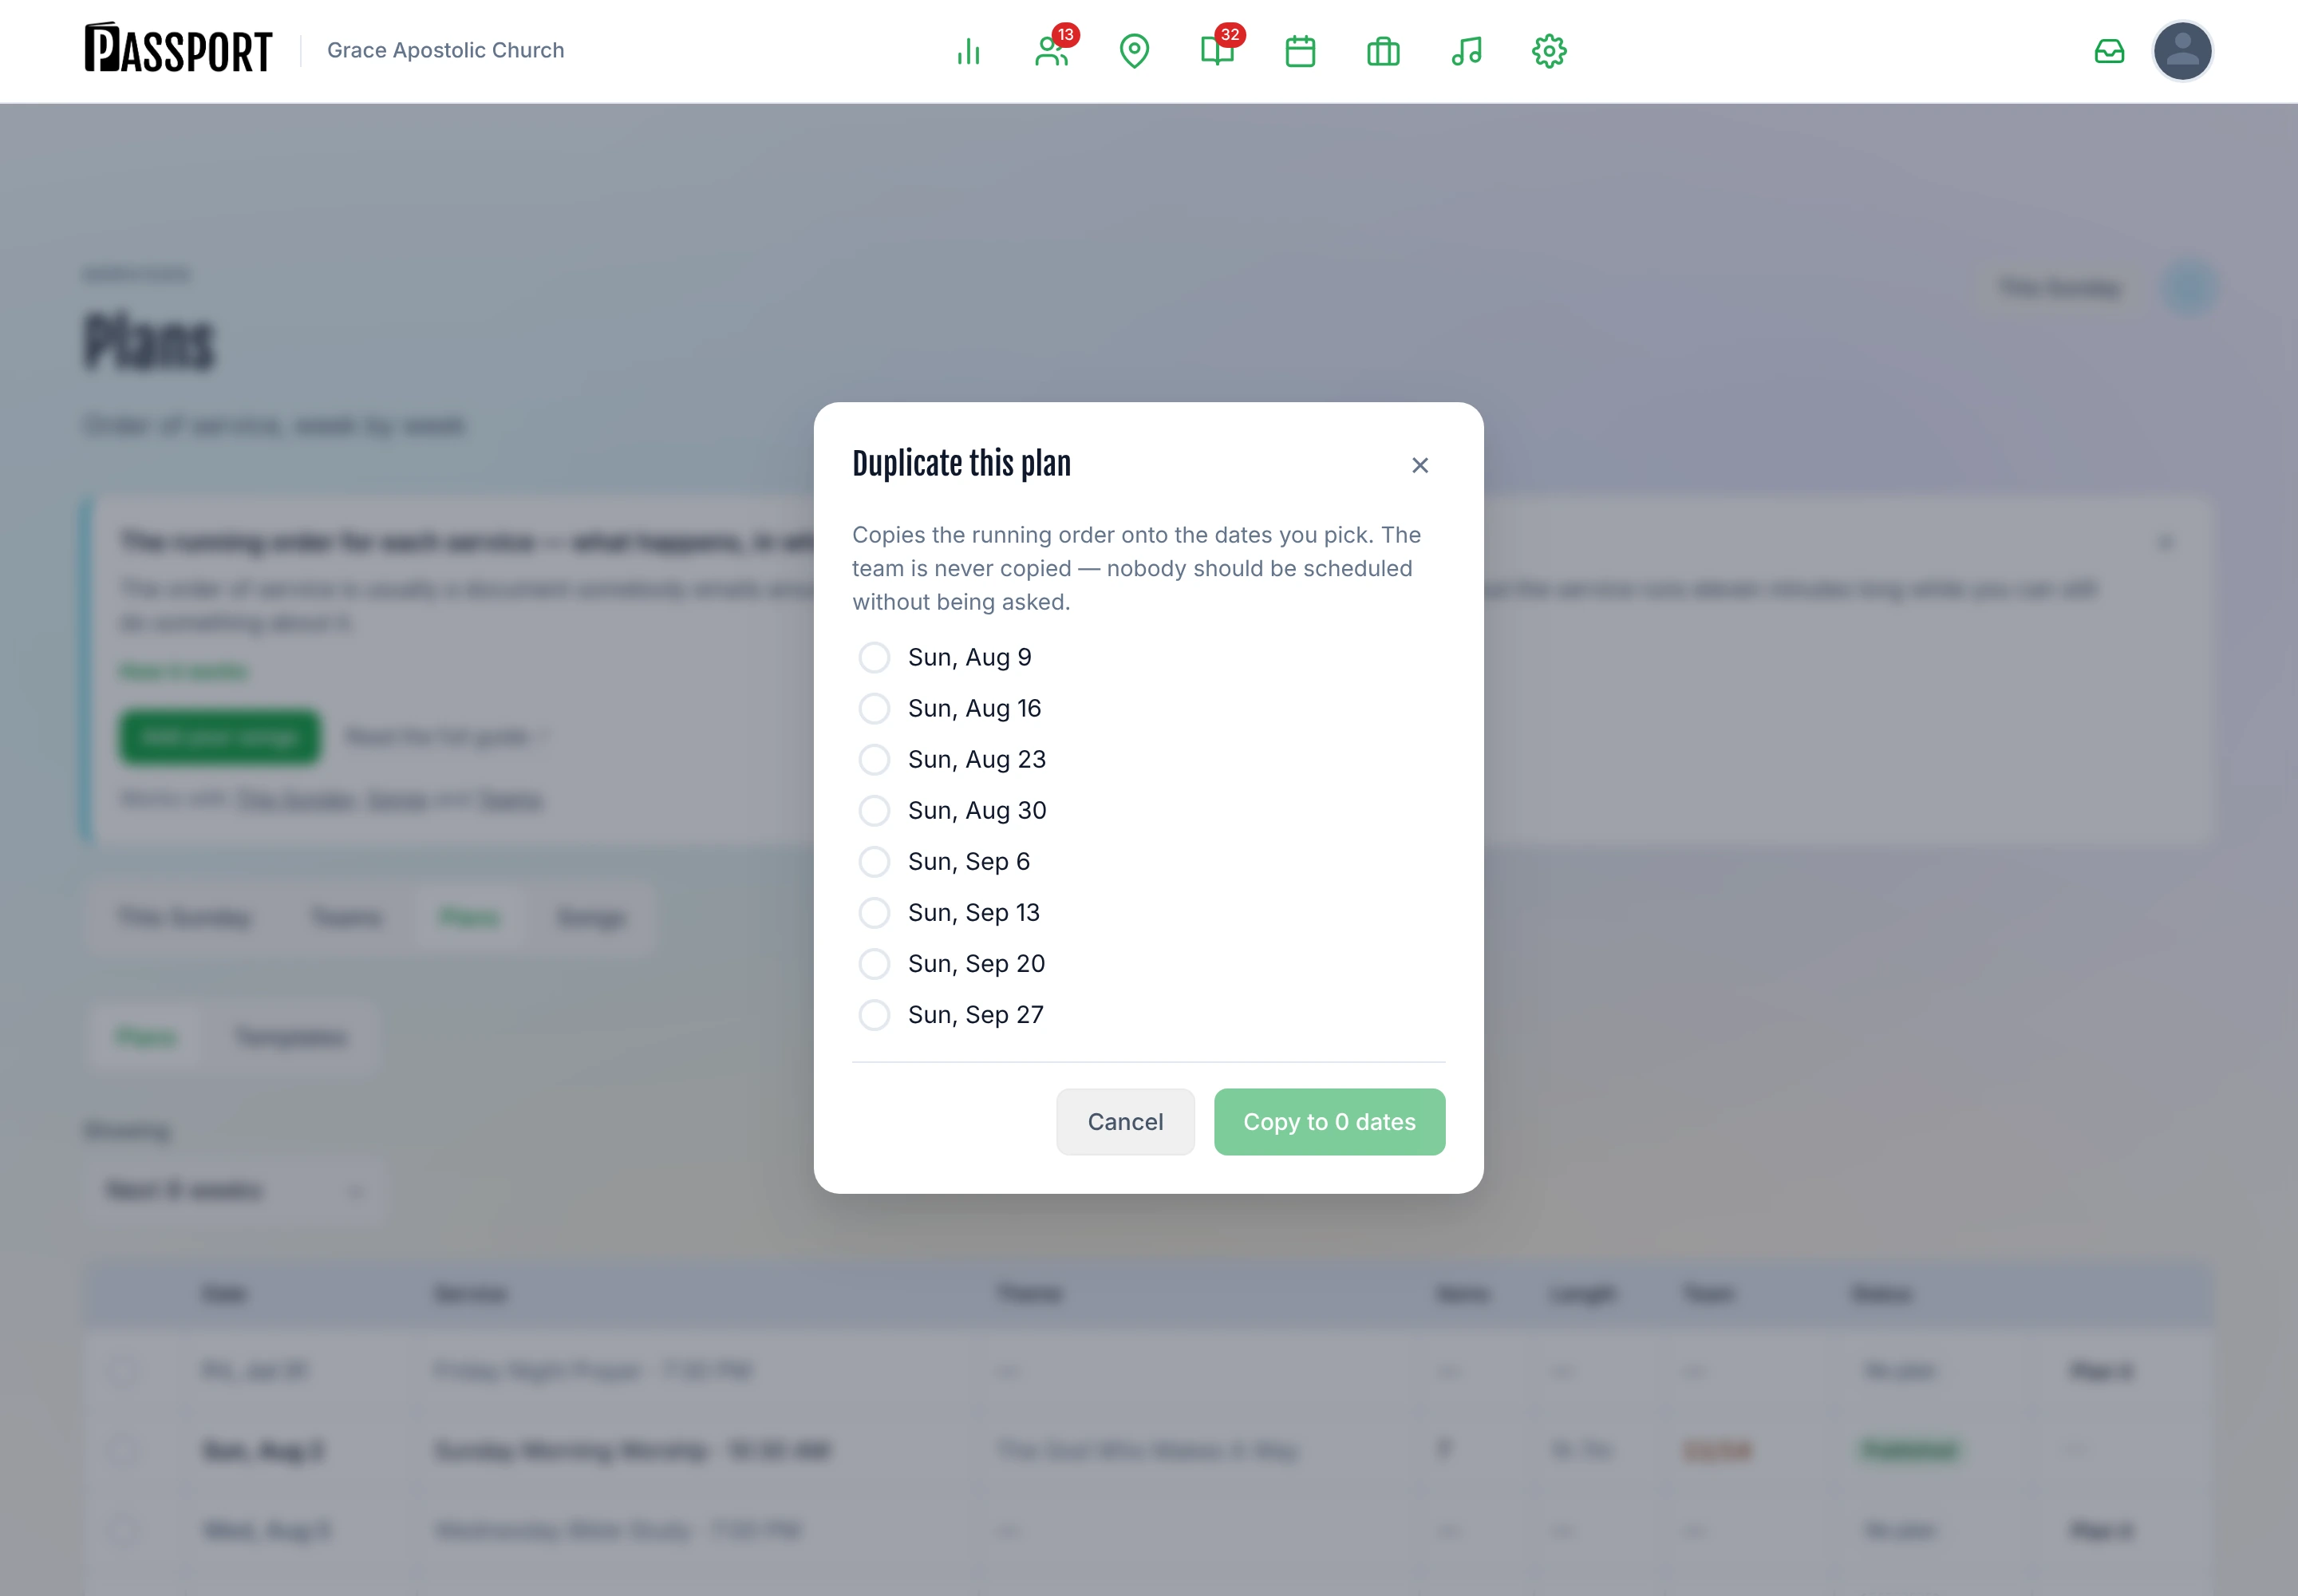
Doing several at once: tick the plans in the list instead, and the bar that appears offers Duplicate to next 4 weeks — the same copy, applied to each plan you selected across its own next four occurrences.
What gets copied: the title, the notes and team notes, the start and call times, the running order, and the positions. Every copy arrives as a draft, whatever the plan you copied from was.
What never gets copied: the team. Duplicating a plan does not duplicate its assignments. Copying the roster forward would schedule people for four Sundays nobody has asked them about, and they would find out from a reminder. You fill each week deliberately — see Scheduling Your Team.
If a plan already exists on one of those dates, that date is skipped rather than overwritten. The dialog names the dates it skipped; the bulk action, which spans several plans at once, reports a count.
Step 5 — Publish
Publishing is a deliberate action, not a status you set. It stamps who published it and when, and — unless you turn it off — emails and pushes the plan to everybody on the roster.
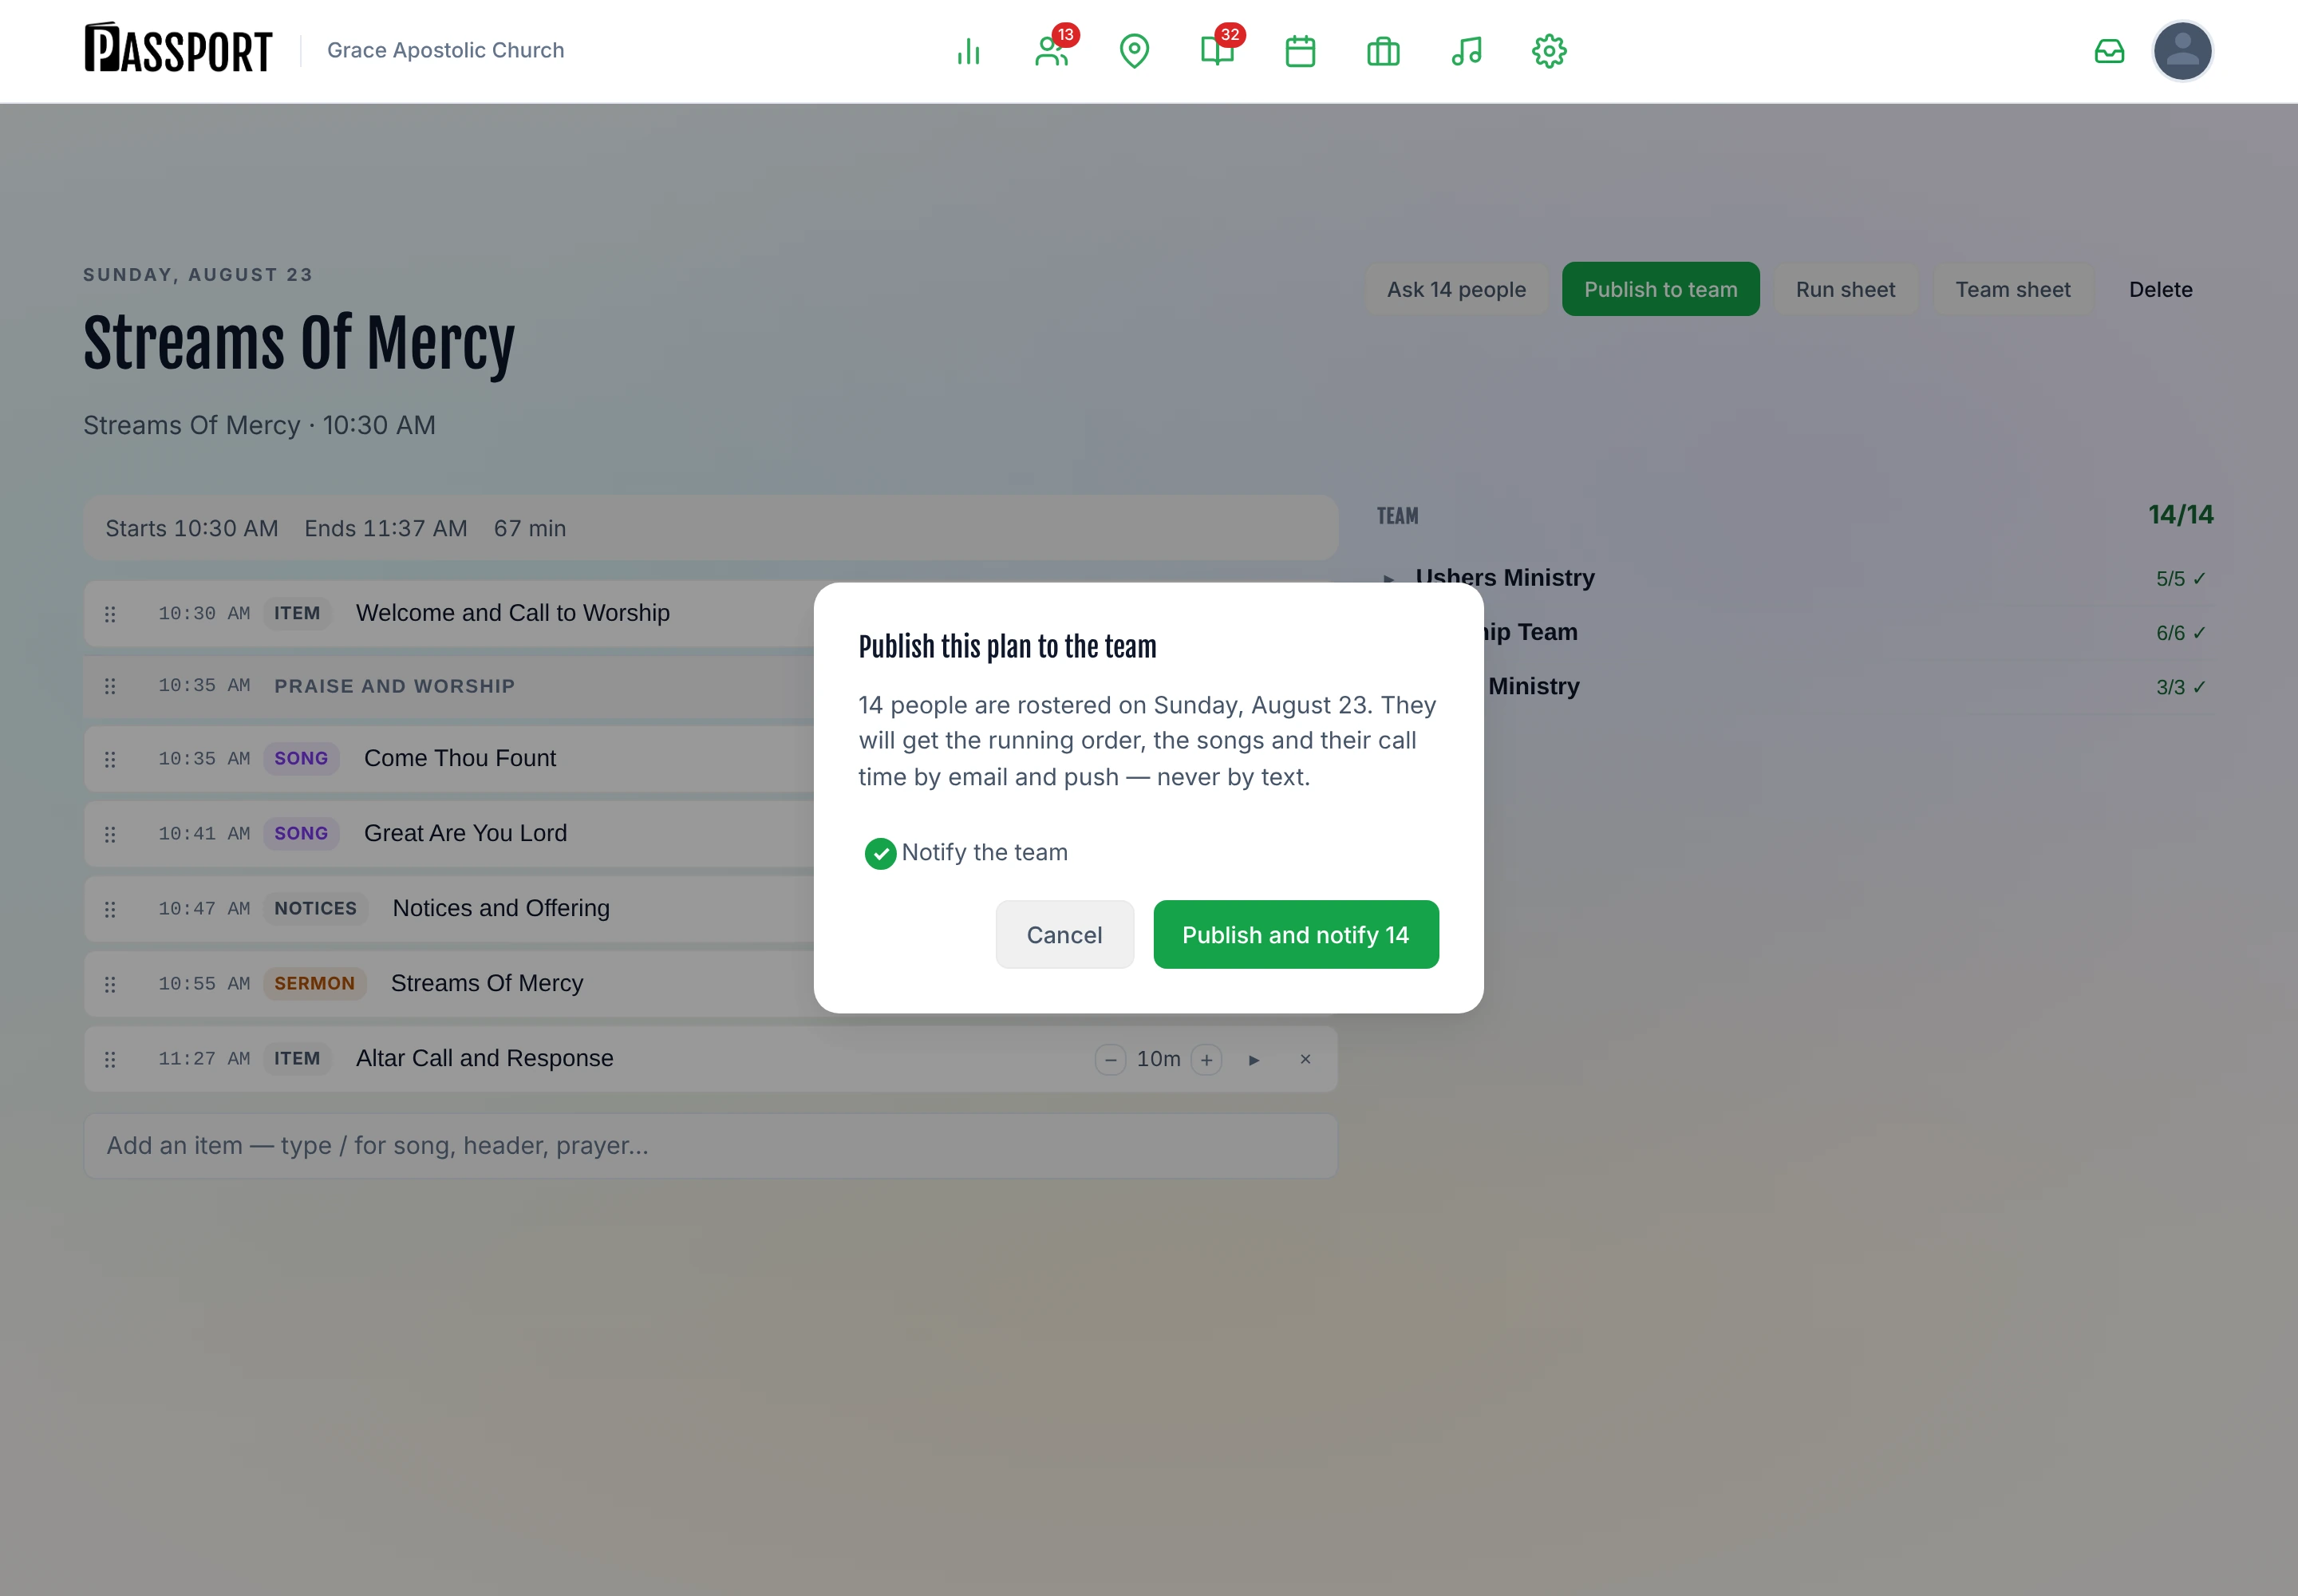
Two things are worth understanding:
- Publishing is not the same as asking. Publishing sends the plan — the running order and the times — to people who are already rostered. It does not ask anybody whether they can serve. That is Ask everyone, covered in Scheduling Your Team.
- You can publish without notifying. Turn off Notify the team to make a plan visible to the office while the roster is still moving. Nobody is told, and no reminders go out about it, until the team is notified.
Notification goes by email and push, never by SMS. A plan is a page of detail, and texting it to forty people costs real money per message for something they will want to read on a screen anyway.
:::tip Publish before the reminders matter Reminders go out seven days and two days before the service, but only for plans whose team has actually been notified. A plan published on Saturday night has missed both. :::
Calling a service off
Snow, a burst pipe, a funeral — a Sunday that is not happening is a real thing, and it is not the same as a plan you built by mistake. On the plan, open the ⋯ menu and choose Cancel this service.
Cancelling keeps everything. The plan stays, the roster stays, and the record of what you had intended stays. What changes is that the plan stops being visible to volunteers and no reminders go out about it. Nobody is told automatically — cancelling a service is news, and news is worth sending yourself rather than leaving to an app.
The plan then carries a Cancelled pill in the list and a banner on itself, with Reopen as draft to put it all back if the thaw comes early.
Deleting is the other thing, and it is for a plan that should not exist — a duplicate, a date you got wrong. Deleting takes the running order and every assignment with it, permanently.
Common questions
Can I unpublish a plan? Yes. Unpublish, on the plan itself, puts it back to draft and hides it from volunteers again. It does not un-send the emails that already went out.
I changed the running order after publishing. Does the team get told? No. Republish, or send the team a note. Passport does not currently notify on edits to an already-published plan.
Someone is on the plan but the plan is a draft. What do they see? Nothing. A draft plan is not visible to volunteers — they see their assignment, but no order of service, until it is published.
Why is my new plan empty of positions? The service has no staffing template — no ministries are ticked against it under Admin → Settings → Services, so there is nothing for the plan to copy in. Tick them, then use Edit positions → Apply staffing template on the plan to pull them in without rebuilding it. See Positions & Teams.
This week needs four vocalists, not three. On the plan, Edit positions in the Team panel. The panel switches from listing people to listing what the plan asks for, with a stepper on each. It changes this plan only — the ministry's default and every other Sunday are untouched.
I removed a position and people vanished from the plan. That is what removing a position does: an assignment whose position no longer exists would be invisible everywhere while still counting as a commitment. Passport warns before, and says how many people came off after. They are not told, so tell them.
Next steps
- Get people onto it — Scheduling Your Team covers requests, auto-fill, and open spots.
- Get the songs in first — Song Library.
- See it from their side — For Volunteers is what lands on a phone.